Constructing a Tim Holtz Village House

I love all things Tim Holtz and was excited when the Sizzix die set Village Collection was released on October 2nd . Tim had previously released large steel rule dies for making houses, but I only owned a few of them and that limited what I could make with them. And I hadn’t even used them yet. Those older dies had been discontinued and the price had soared on the secondary market, so purchasing the rest of the set wasn’t really an option. This new set was now in Thinlits dies, making storage easier, and providing so many more options to customize the buildings. Plus, there were three mini embossing folders released the same day – brickwork, lumber, and stone. So, I set out to find a set to purchase and try my hand at tiny house construction.

My set arrived a few days after I ordered it and my first task was to organize the dies. Tim’s live YouTube on the release day mentioned a system created by igirlzoe, so I went to her blog to check it out. I purchased a couple of magnetic vent covers, cut them into equal parts, then set to work sorting the dies. The set includes two main houses, a manor tower addition, a side addition, an entryway, bell towers, awnings, chimneys, roof shingles, doors and so many windows! Once sorted, it’s a bit easier to find the piece you are looking for – now to decide what to build.

I started with the smaller House 1. I chose the house outline die, and placed it on my Sizzix cutting plate, onto which I had placed a sheet of Sizzix’s sticky grid, to help line everything up. Then I set about deciding what doors and windows to place. I cut the house pieces out of some basic paper, then set about constructing the house. I glued up one side, then decided to put mica in the windows while the house was still flat. Then I glued the other side. Now, I wanted to add a skin with texture – and found I had made my first big mistake. I had taken the dies off the cutting plate and replaced them on their sheets – oops. In order to have the “skin” match the house – you need to cut the paper for the skin from the same layout. I managed somehow to get the pieces back to almost the same location, then I was able to cut the pieces I needed. I put each piece through the embossing folder, then added ink and distress crayon. Again I found a construction error – it is better to cut off the tabs that aren’t needed for the skin before doing the embossing and inking. And before embossing it would be a good idea to mark the folding lines – they tend to disappear when you put the texture on.

Now to add the skin to the house. I used Distress Collage Medium smeared on the back and used some clips found in a bag at the thrift store to hold the pieces in place while the glue set. I cut frames for all the windows from black cardstock and glued them in place with Bearly Art precision craft glue. Again, the clips came in handy for holding the pieces in place.

Adding the roof was the next step – a bit fiddly trying to get the tabs in the right place and the corners lined up, but I managed. Next to cut a pile of shingles – the design of the dies means you cut an entire row of shingles that are just the right size for the roof of the house – it makes the roofing job easier – at least on the back. The shingle pieces were cut from grey card stock and inked with Distress Black Soot. I used double sided tape to attach the shingles on the rear roof, then turned the house around and considered the front roof, with its perpendicular roof segment over the front door. After cutting a few by trial and error, I found a triangle template that matched the angle of the roof and used that to cut my pieces to fit, remembering to overlap the shingles on each row. The front of the roof was done in bits on both sides until I was able to add full shingle pieces. I also found a small piece of real wood veneer and cut a front door for the house. Now that my house is built, what to do with it?

I found a rough wood box in my stash that would nicely fit my house and a little landscaping. A piece of faux moss sheet worked well, and now it was time to decorate. I thought about making some “wood slices” for the pathway and used the lumber folder to emboss some brown card. Though I liked the look of the inked paper, the small circles I cut didn’t look right and would not stay where I placed them. So I cut a pathway from cardboard and covered it with bits cut from the embossed and inked paper.

I used the fence die from Tim’s Halloween Sizzix Halloween Vault Series set and cut 8 sections – 6 of those from black card run through my Xyron to add adhesive to the back. The other two were cut from plain card so the back of the fence would not be sticky. I stacked up four cuts for each fence piece, then lightly dabbed them with a silver metallic inkpad to make them look more like old iron fencing.

I made a tree from a piece of fall garland and some miniature landscaping materials I had around. I tried to use collage glue to attach the tree to a base and to cover that base with “dirt” and I tried to use the same glue to attach the fence pieces to some cardboard bases and embellish with more of the landscaping materials. But it wouldn’t stick and I have the patience of a gnat. So, I pulled out the hot glue gun (I really hate using that) and finished my tree and my fence pieces.

I want to be able to remove pieces from the scene and change it up for the seasons. Right now it has a fall tree, the fence pieces, a jack-o-lantern and a small scottie dog – yes, that’s a monopoly token. They are all put on with sticky dots so I can remove them later.

Posted in paper crafting | Tagged , , | 1 Comment

Creating an Octopus – The Final Vignette

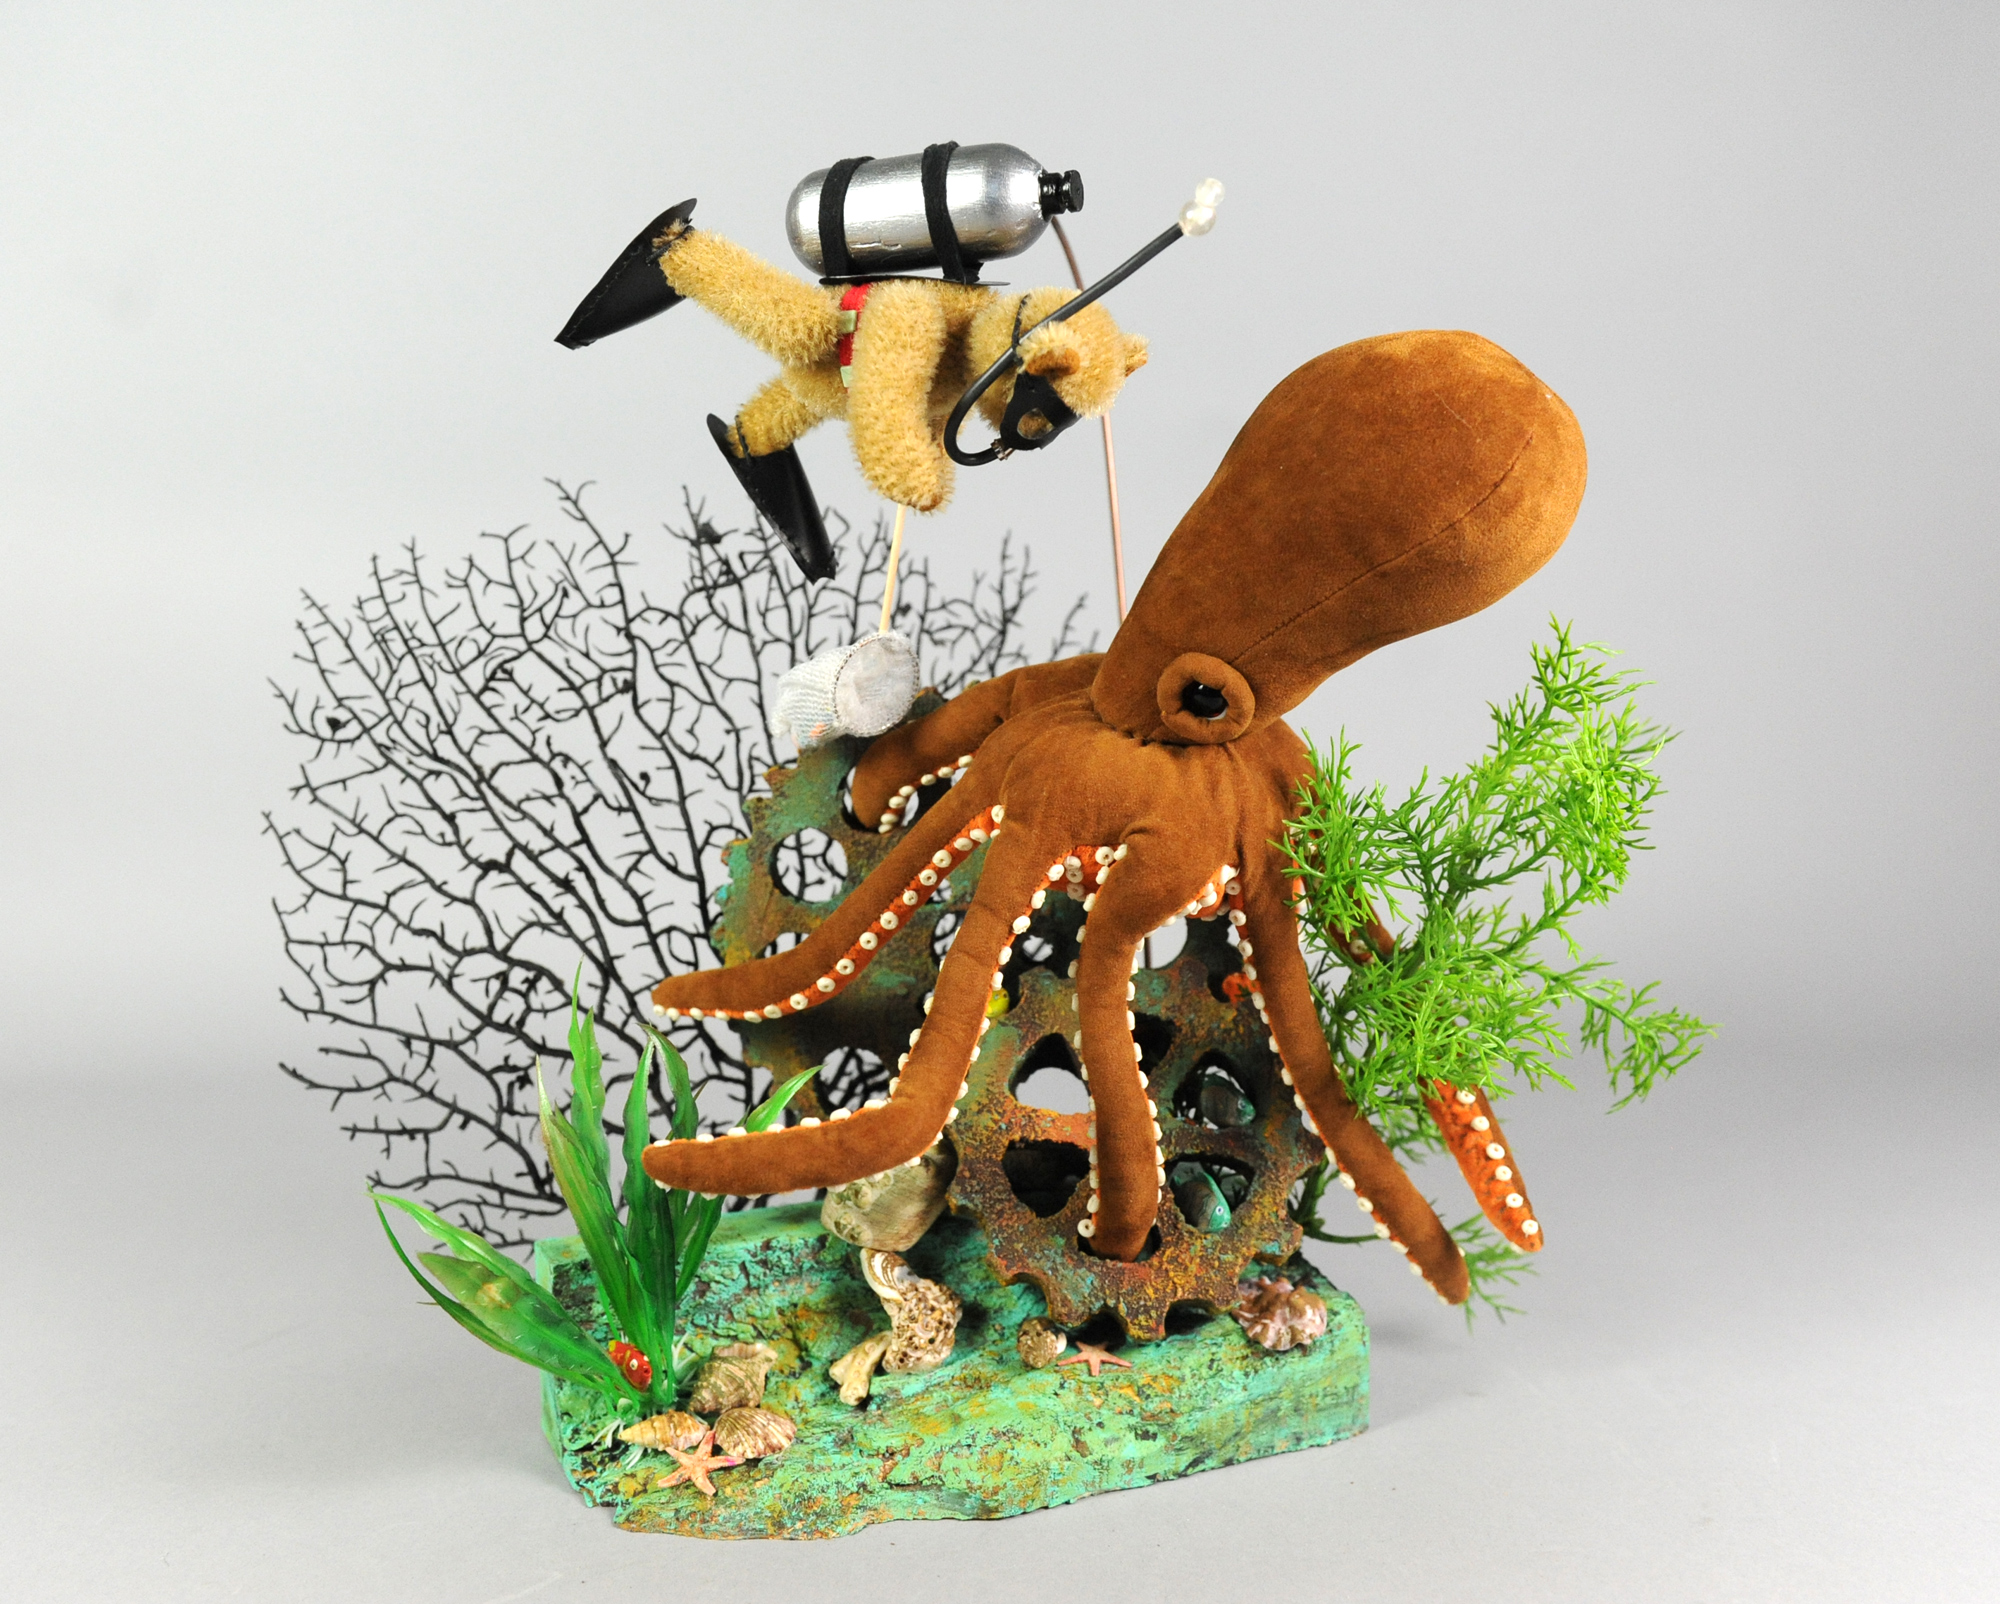
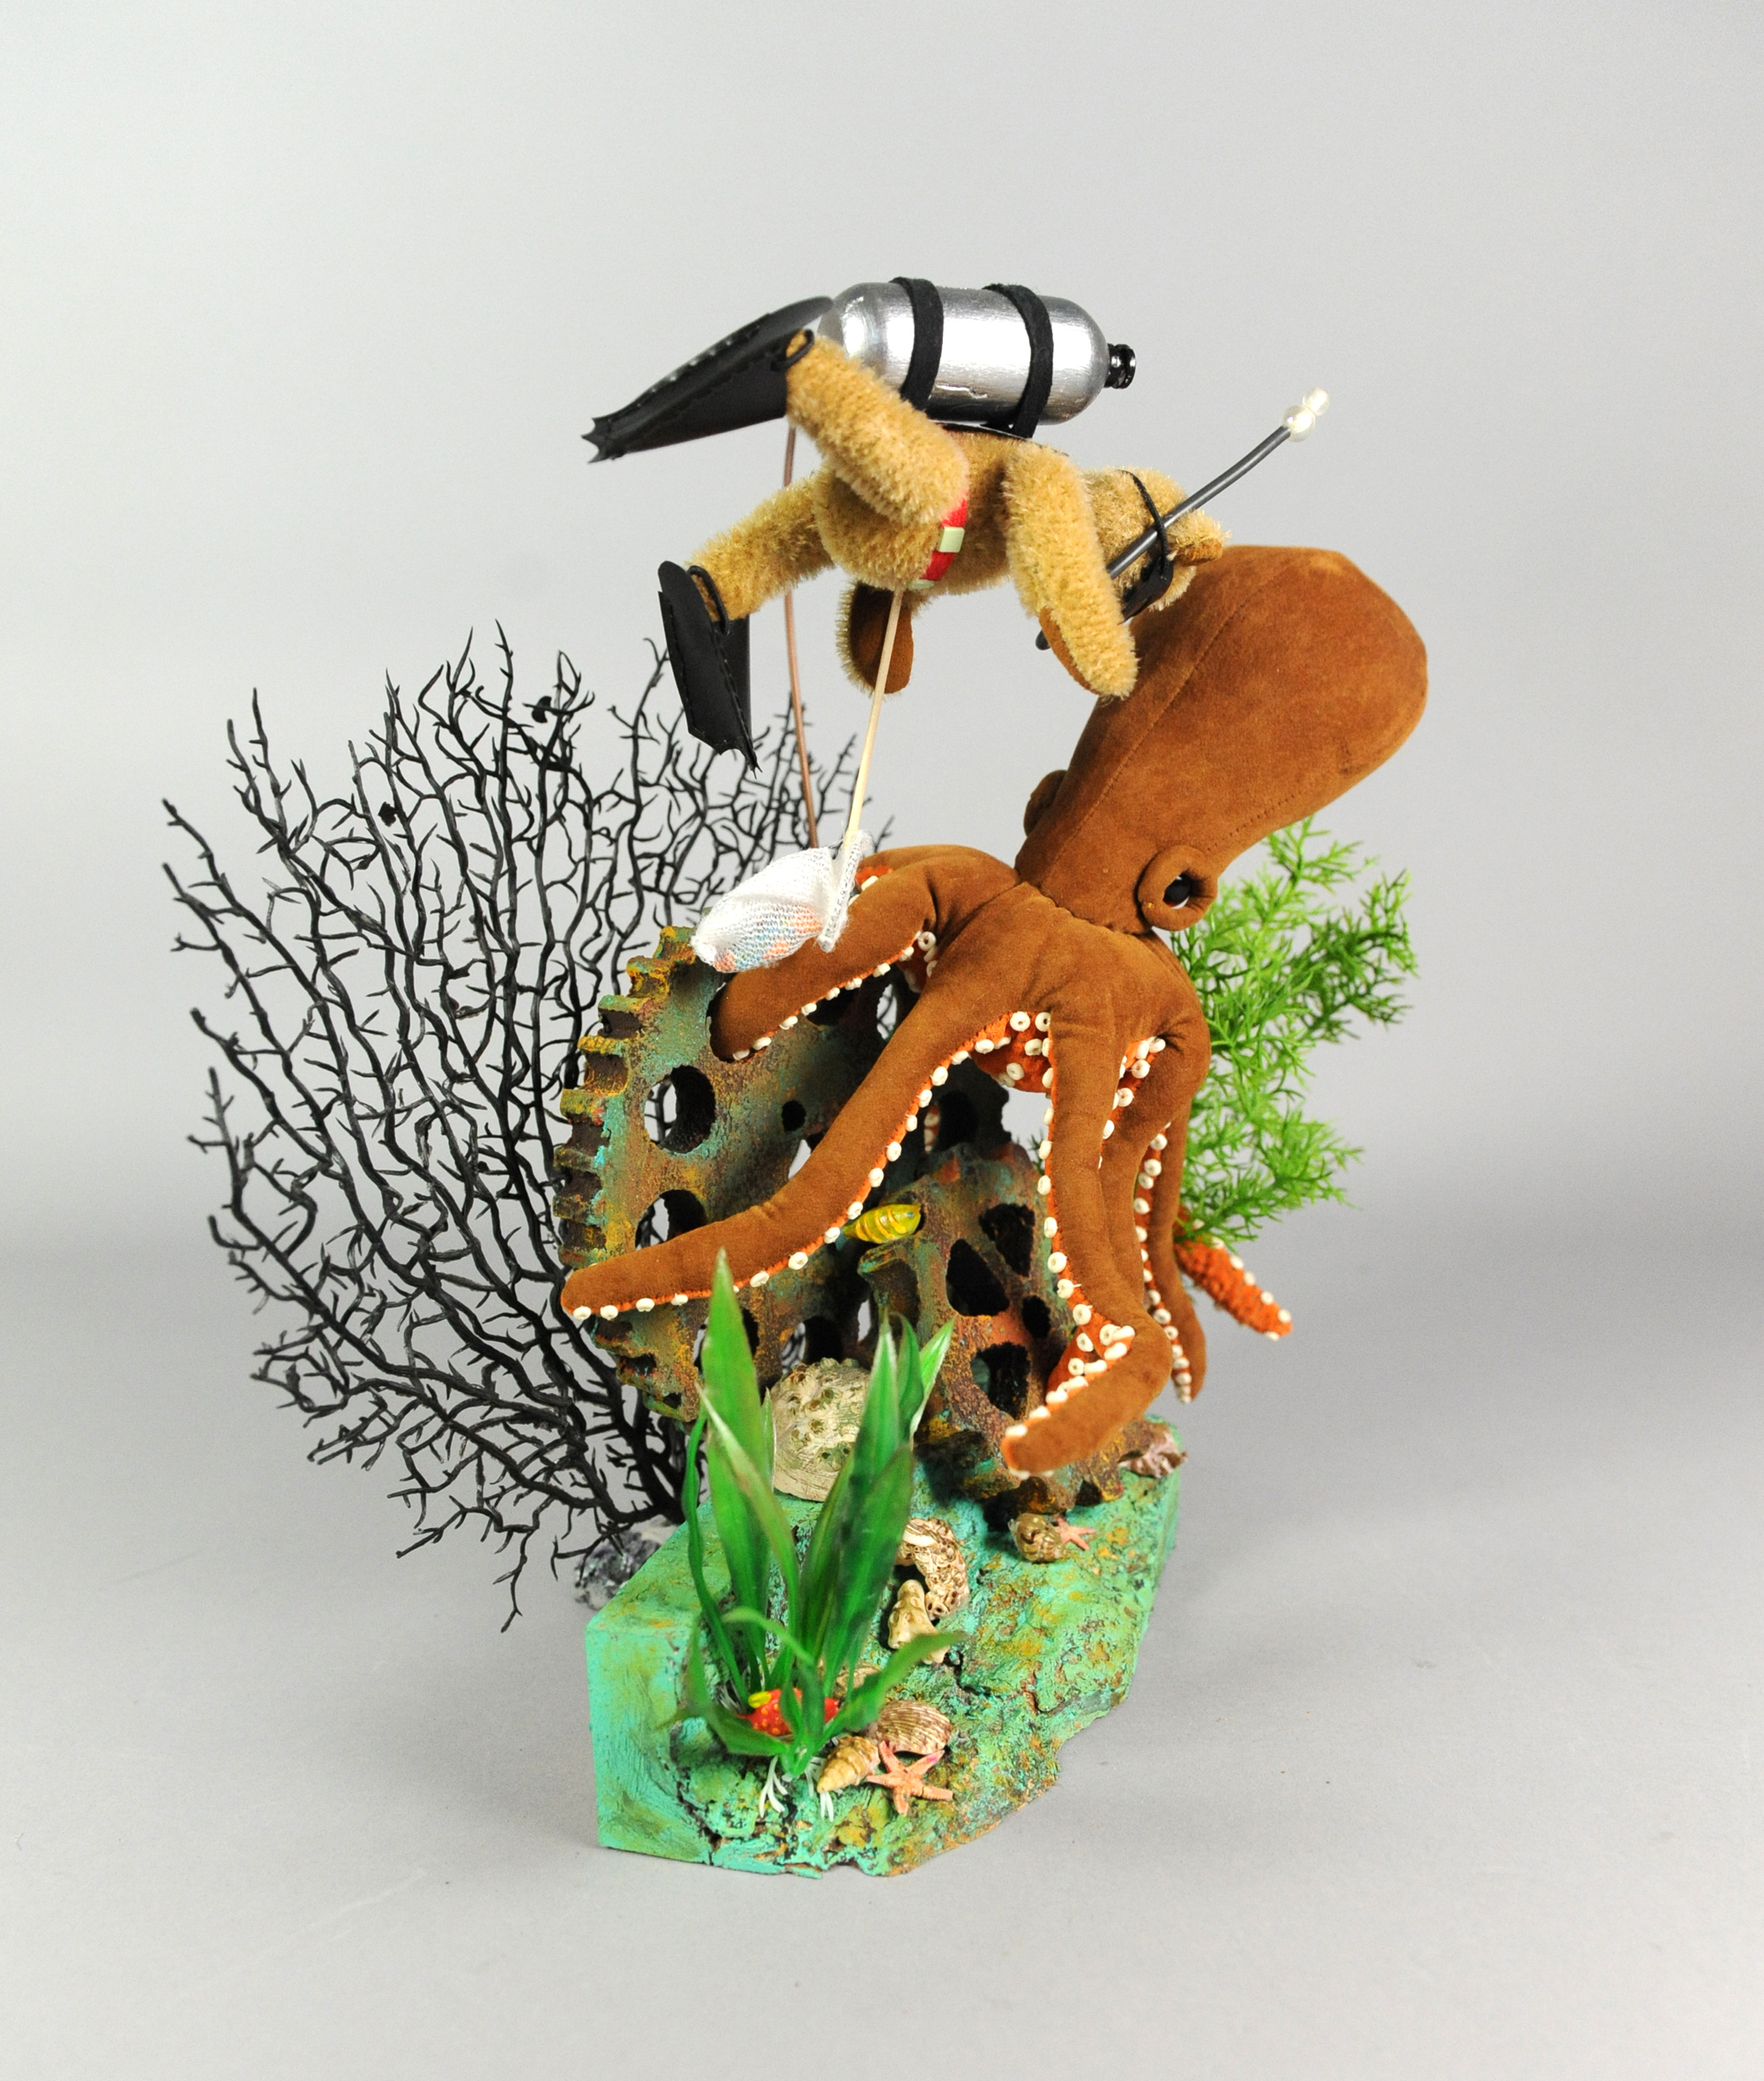
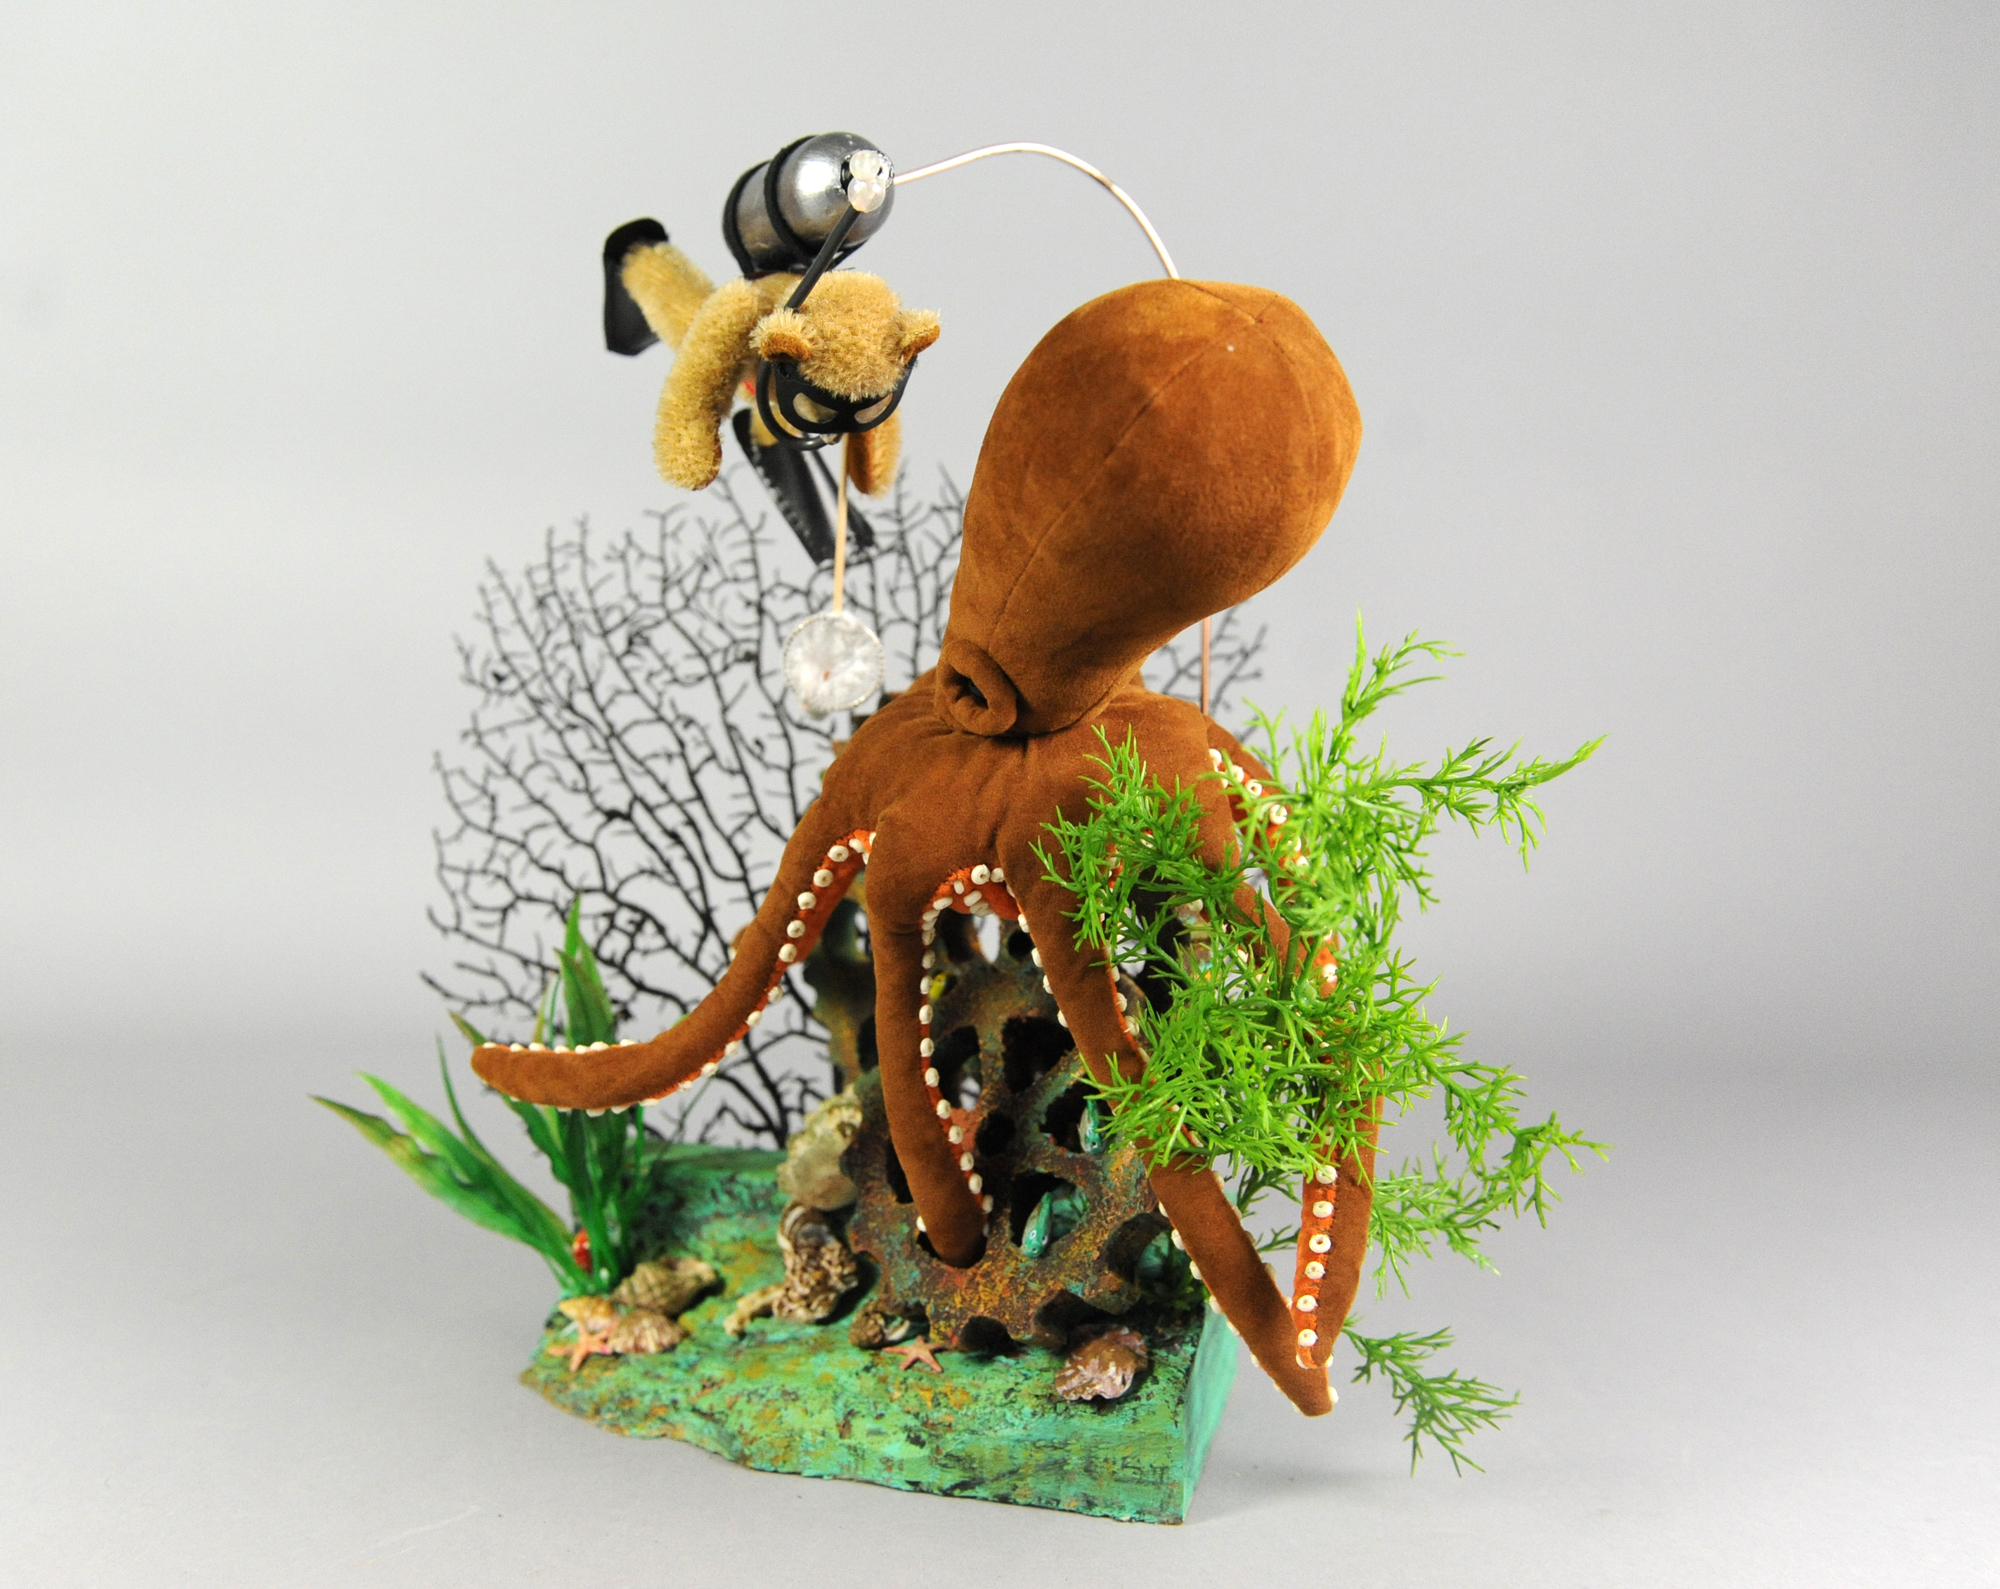
Here is the final finished vignette – Jacques and Octavian – I Think I Need a Bigger Net

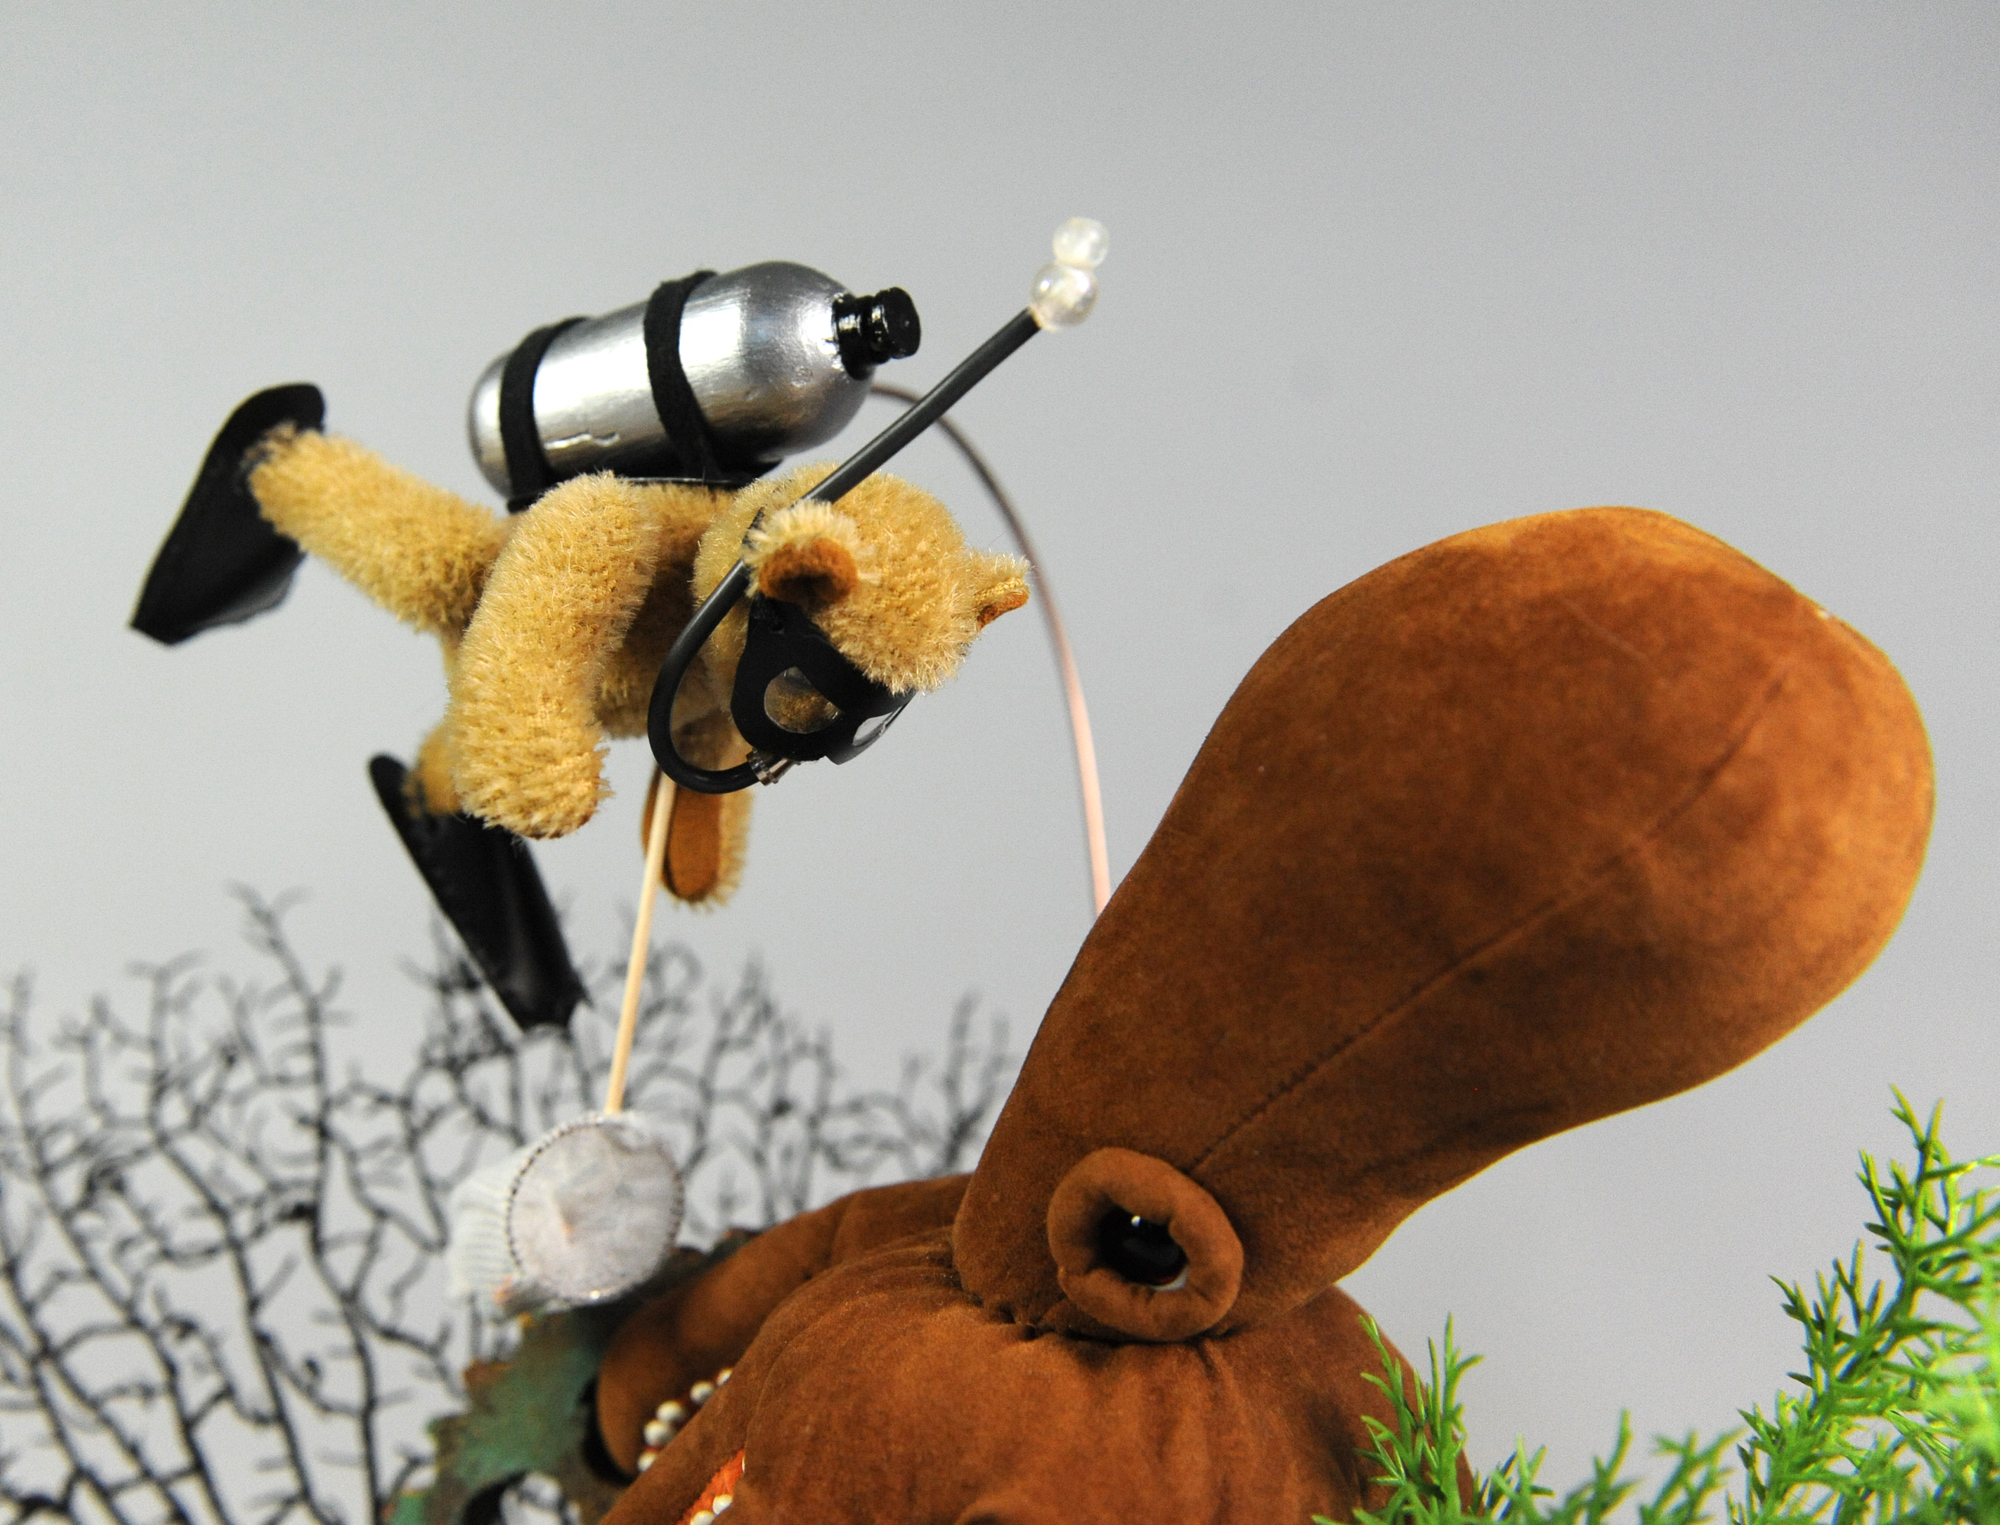
Jacques is wearing a mask made from the same black plastic as his flippers and his snorkel is a piece of electrical wire with the insulation intact. A few clear plastic beads at the top simulate bubbles.  Here you can see the rod that connects the scuba tank to the ocean base.

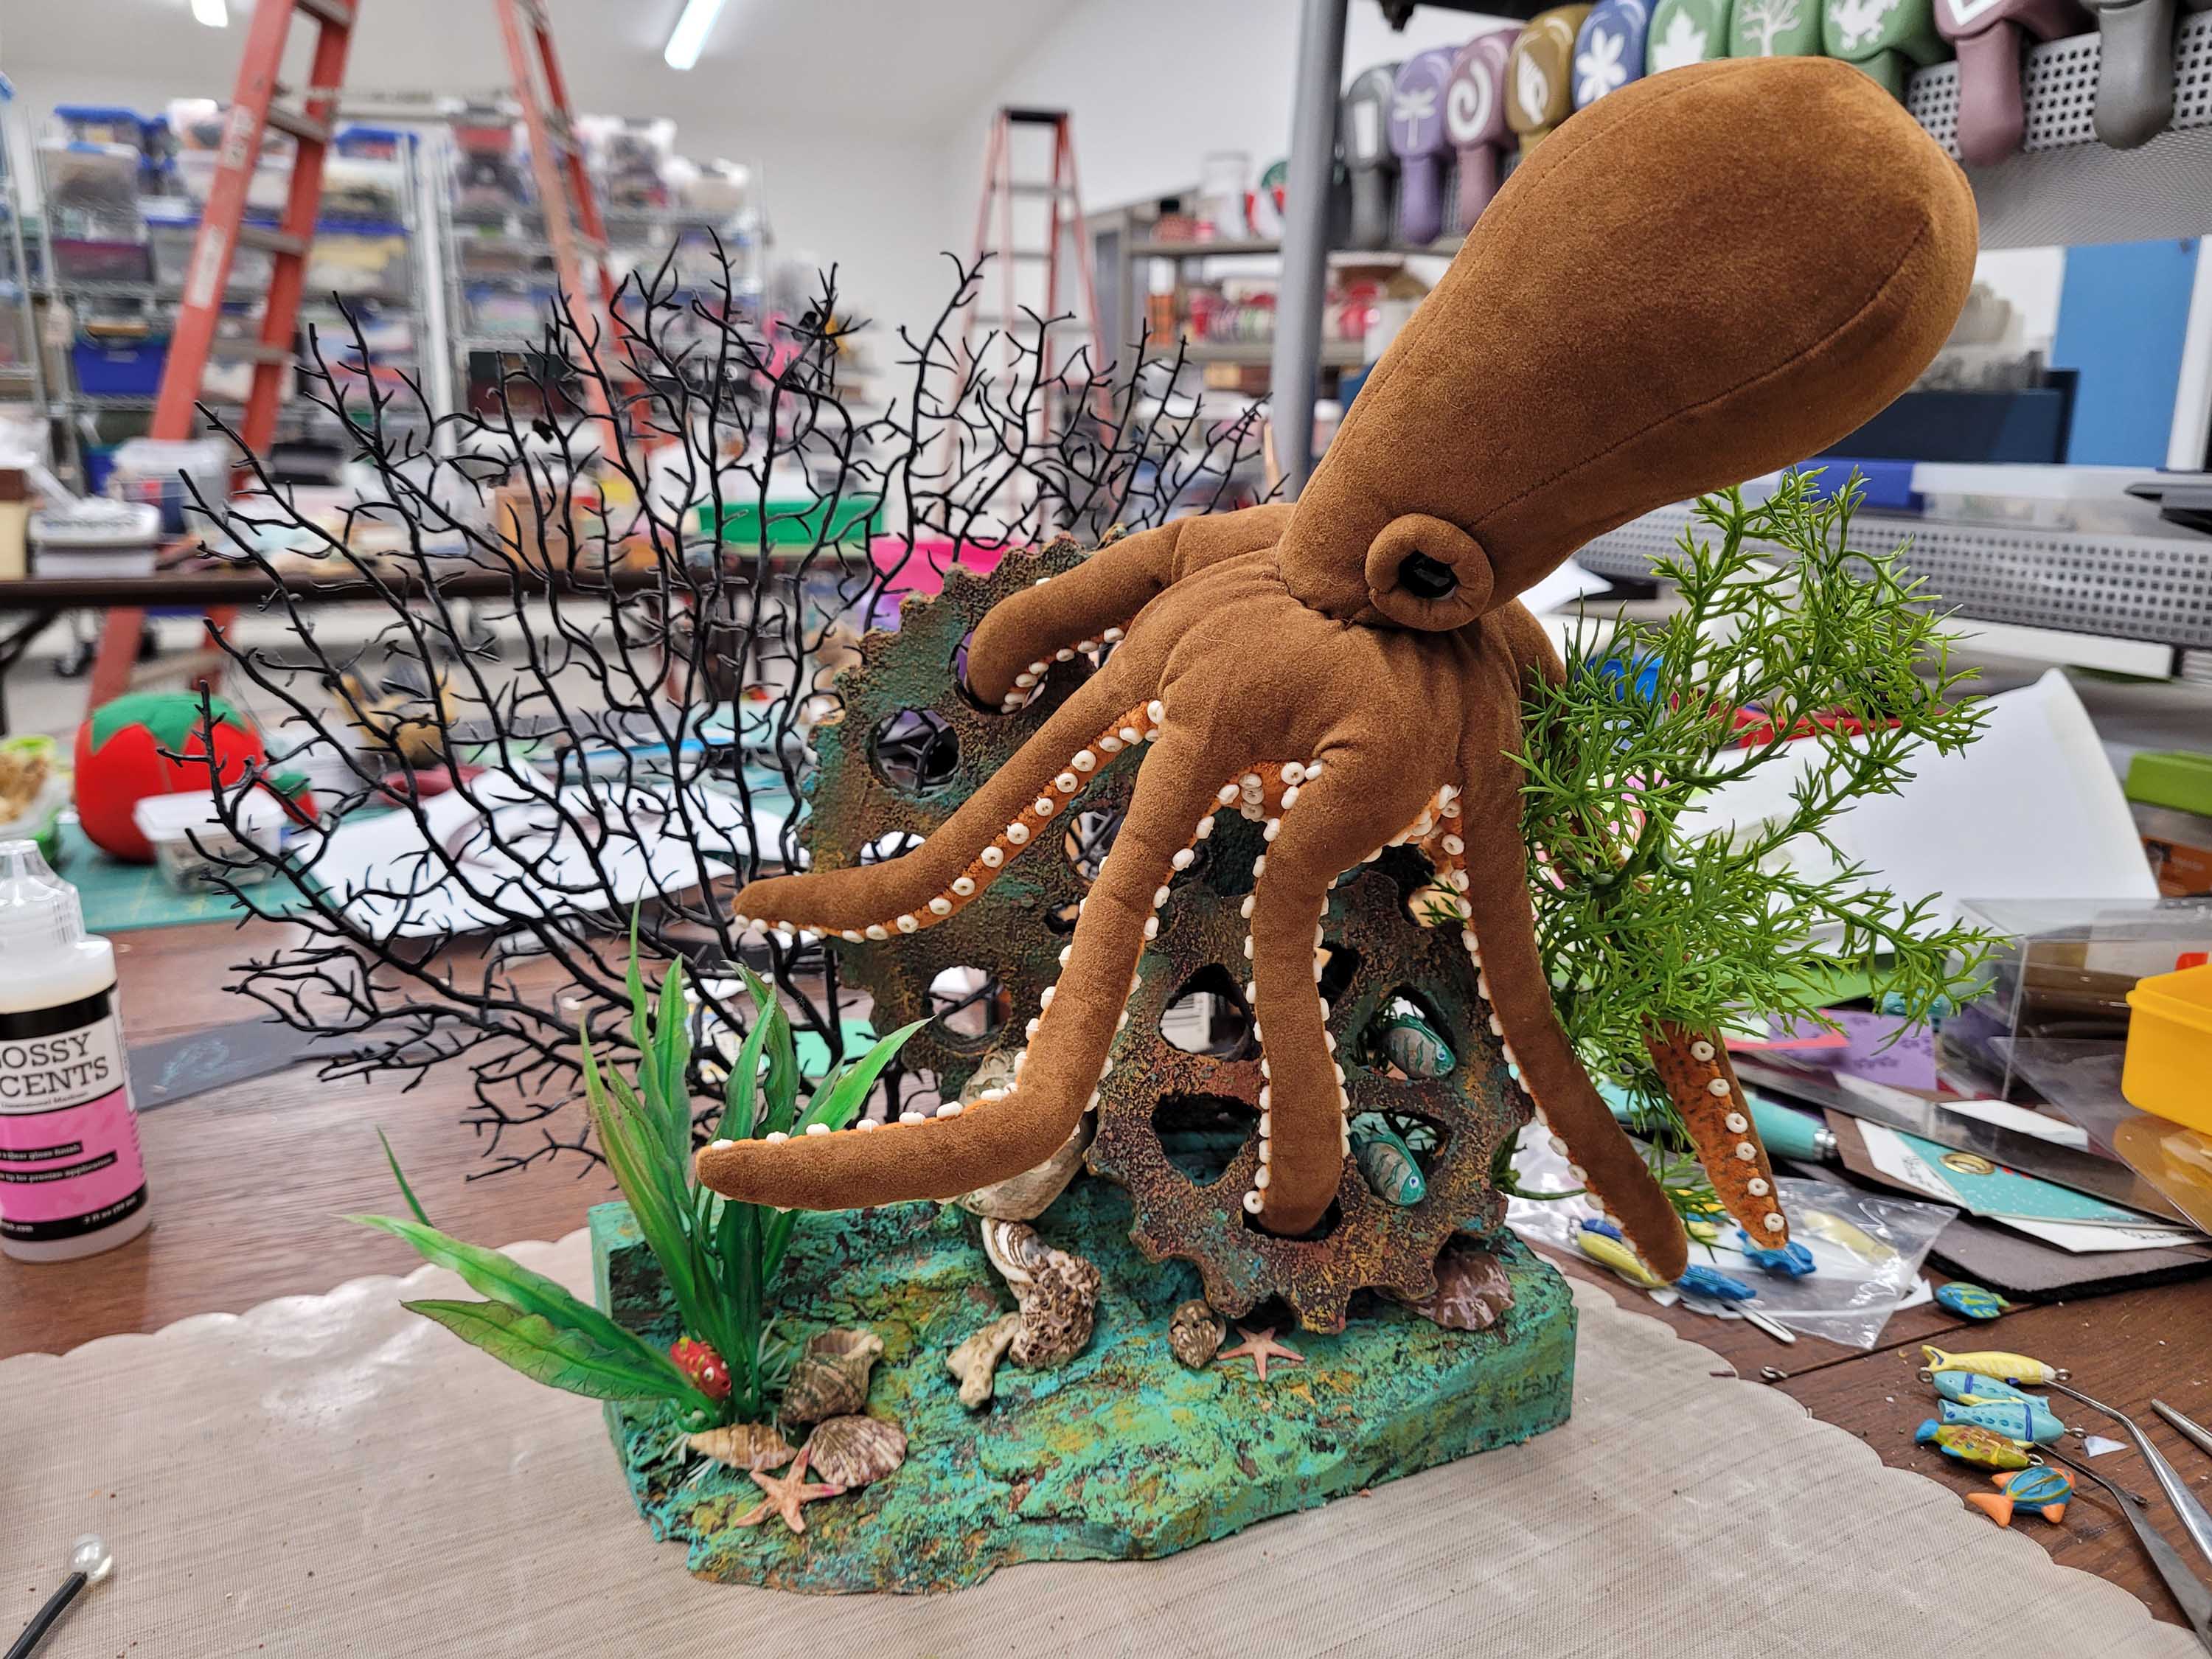
Jacques had planned to dive the site to catch a few of the bright tropical fish he was told swam around those oversize gears. He didn’t expect to meet Octavian, who has decided those gears are a great resting spot.

With Octavian between Jacques and the fish, I think the fish will be safe on this dive.

This piece measures approximately 11″ wide by 13″ high by 5″ deep. It will be for sale during the virtual Philadelphia Doll & Teddy Bear show, from April 30th through May 2.

Posted in teddy bears and such, Uncategorized | Tagged , , , , , | 2 Comments

Creating an Octopus – Part 2

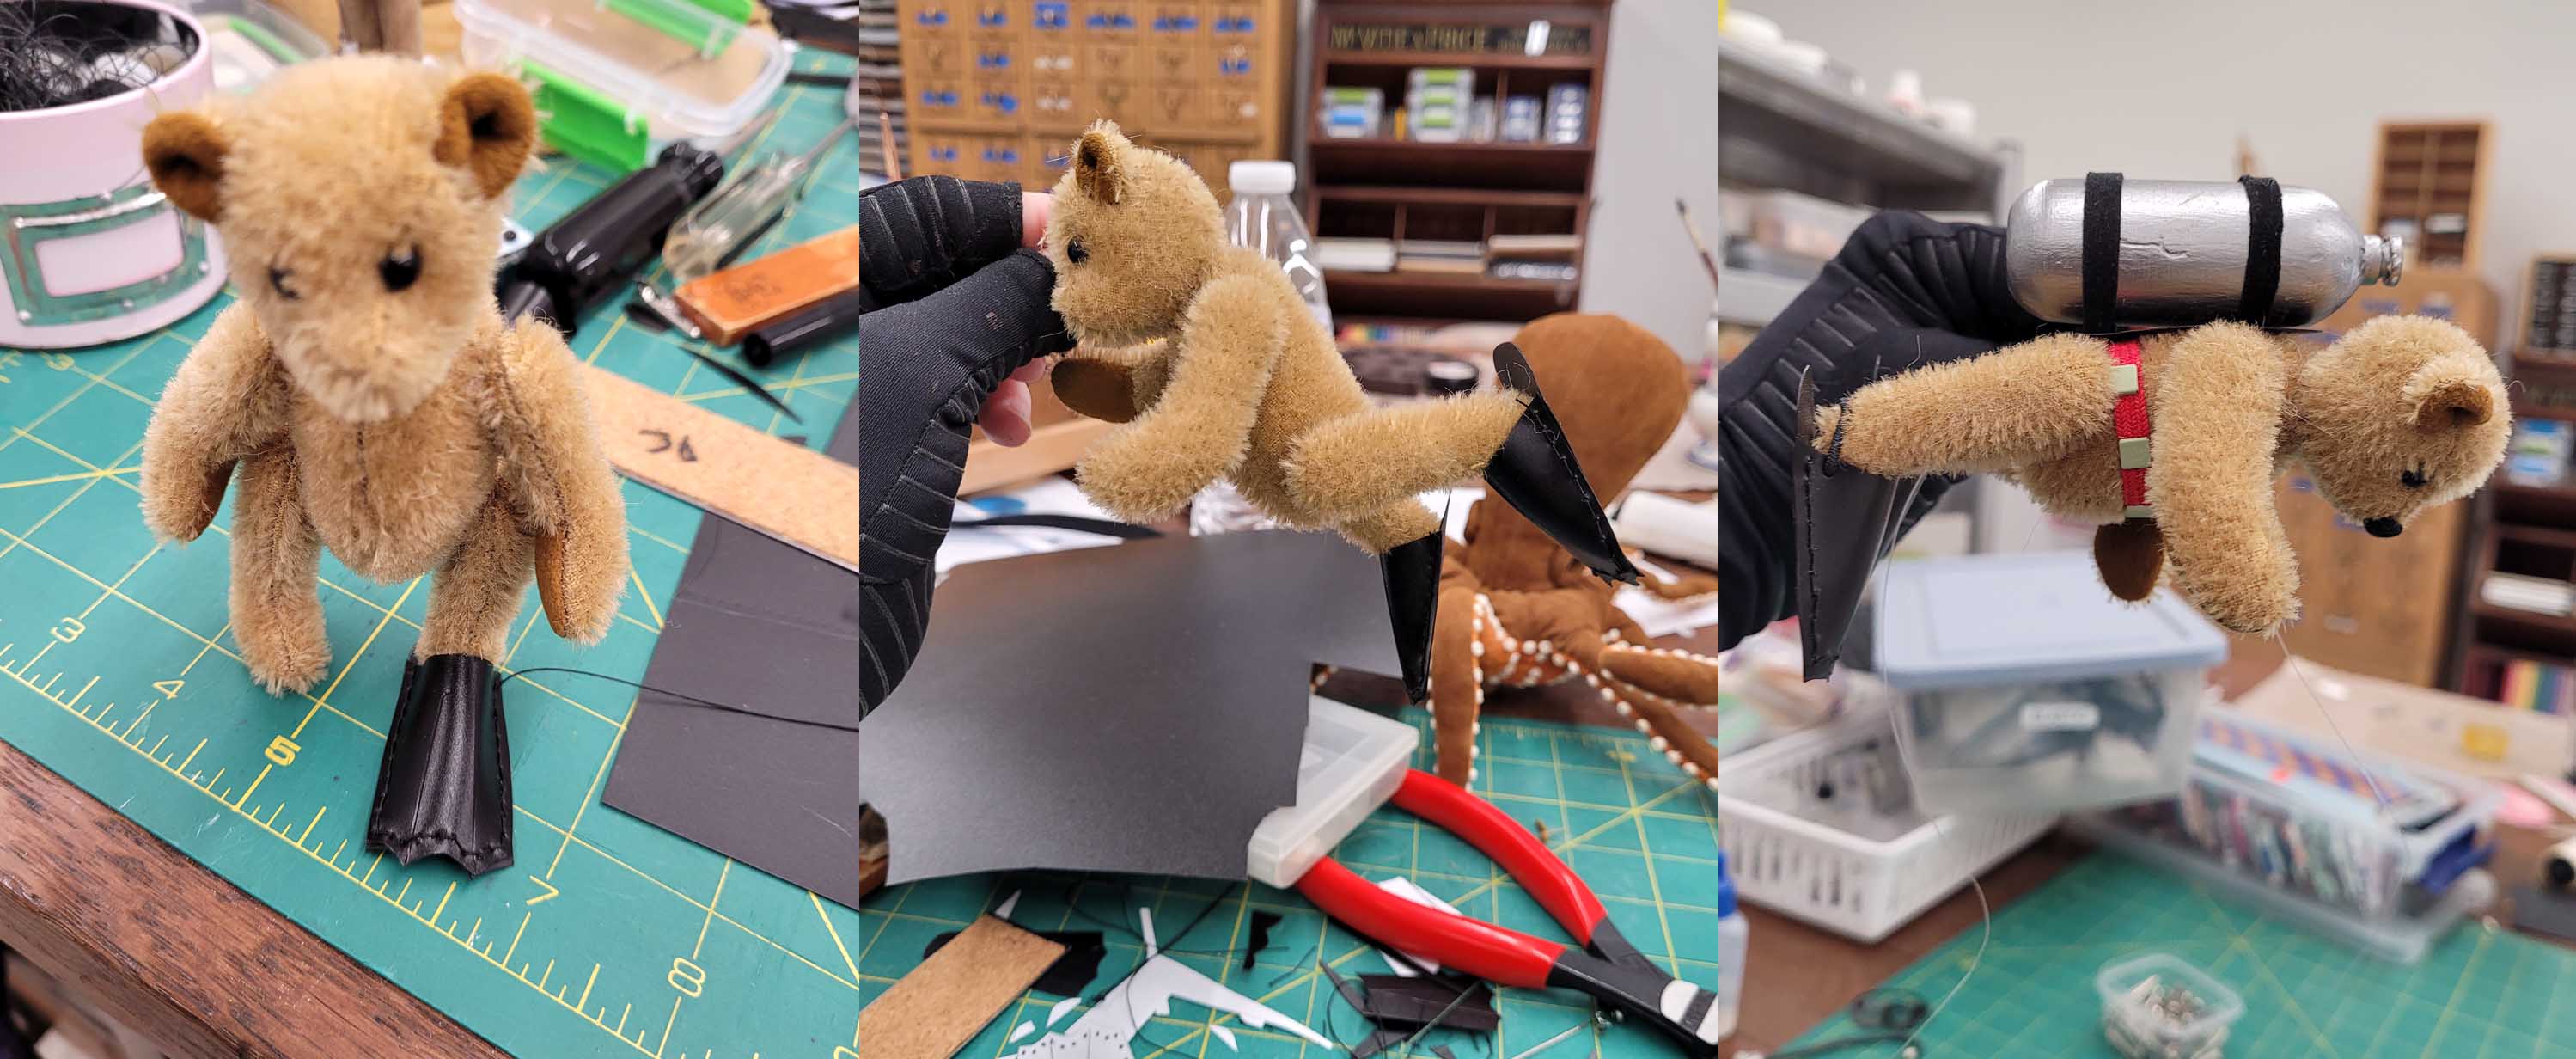
Octavian was completed, but I needed a bear to complete the vignette and a display base for both of them. Some beige short pile mohair was chosen for the bear and then accessories needed to be created. First up were the flippers, which I cut from thin plastic report covers and hand stitched together. They were a bit tricky – plastic is very slippery.

I knew I wanted the bear to look like he was swimming underwater and spent some time thinking about how to achieve that illusion. I didn’t want to have an obvious stand or wire underneath him. I knew he would have a mask and a snorkel, but Bill suggested a scuba tank which could attach with a wire to the base. He was kind enough to create one on his wood lathe and I had to construct a way for the bear to “wear” the tank and hang from it.  That was accomplished with more black plastic and some thin strips of ultrasuede, as well as some creative stitching. His dive belt was made from a piece of red braid with tiny square metal studs. Not sure why I had them in my stash or where they came from, but they were perfect to create “weights” on his belt.

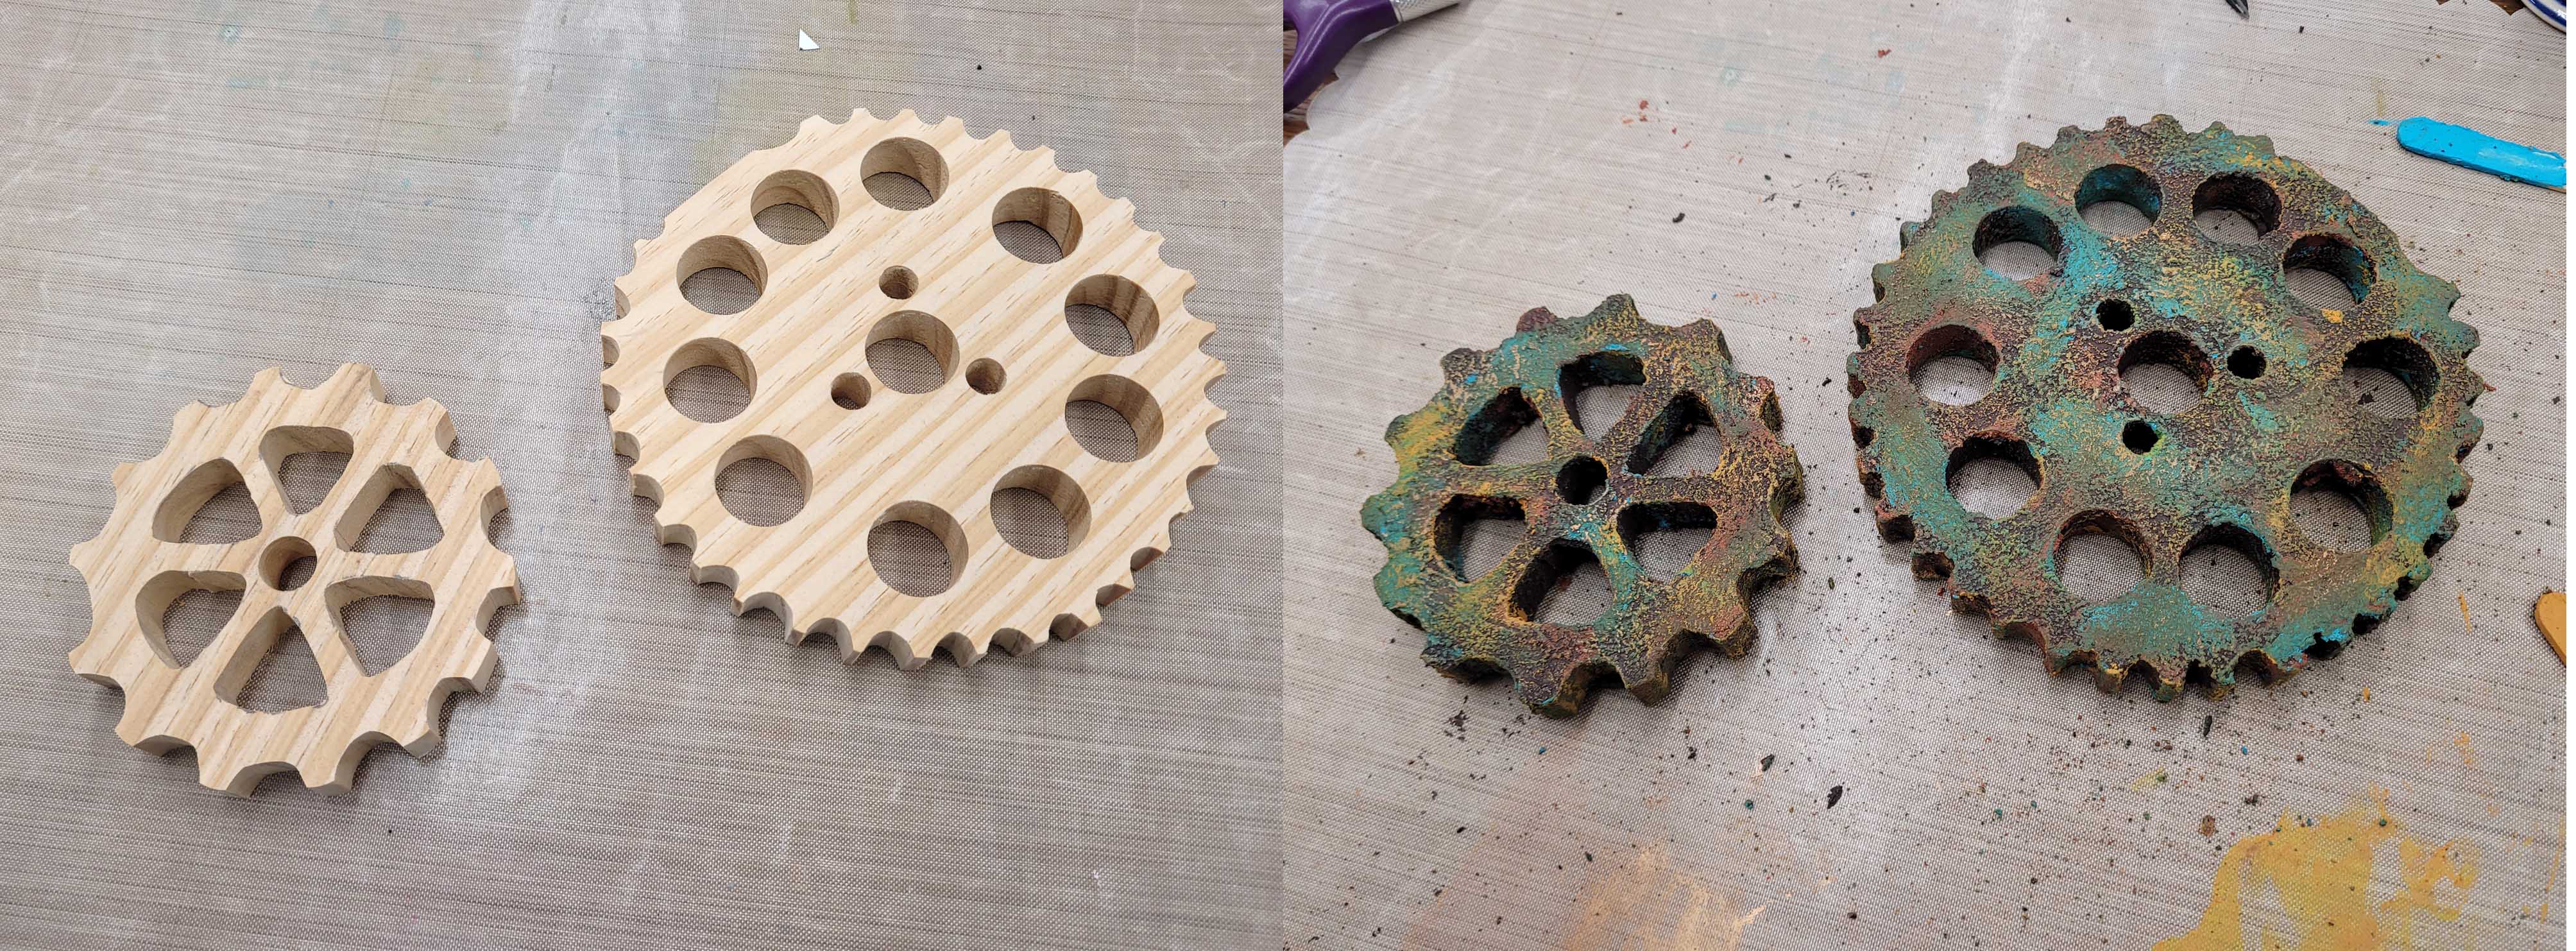
Now, onto the base.  I knew I wanted gears – I was thinking of going more steampunk with the final version. And I wanted something that looked like it would have been at the bottom of the sea for years.  Yet I didn’t want the weight that metal gears would have created.  So I cut some gears out of wood with the scroll saw.  A bit of magic from patina kits by Finnabair transformed them into old, rusty, timeworn “metal”.  I love those patinas and they are so much fun to use.  And they work on so many surfaces.

When the gears were done, it was back to Bill’s wood shop to find a base and figure out how to attach them.  In Bill’s reject pile was a piece of live edge southern yellow pine – no good for his woodworking projects but perfect for me. With Bill’s help, holes were drilled in the larger gear and the base and they were connected with a dowel and some wood glue.  The smaller gear was put in place with glue and carefully aimed finishing nails.

Back to the studio for a coat of paint and the addition of some plants and shells.  The plants are plastic aquarium pieces (found a bag of these at a thrift store) and the shells are real ones given a bit of patina to grunge them back up.  Also, hidden among the plants and gears are some small fish that started life as wine charms.

The gears ended up being perfect for Octavian to wind his tentacles around.  And with the help of a metal rod, Jacques the diver would appear to be encountering him at the bottom of the ocean.  I’ll put up pictures of the completed project tomorrow.

Posted in teddy bears and such | Tagged , , , , , | 1 Comment

Creating an Octopus – Part 1

Well, it’s been over a year since I’ve put up a blog post. It isn’t that I didn’t create anything in 2020, but with the continuing construction work on my new studio, I’ve not made much. And there are always chores around the farm, or prep work to be done for the farmer’s market. Plus, with Covid affecting all types of events, I didn’t do any travelling to shows in 2020 or yet in 2021. Everything was cancelled and moved to online shows, including this year’s Tampa show in February and the upcoming Philadelphia Doll & Teddy Bear show.

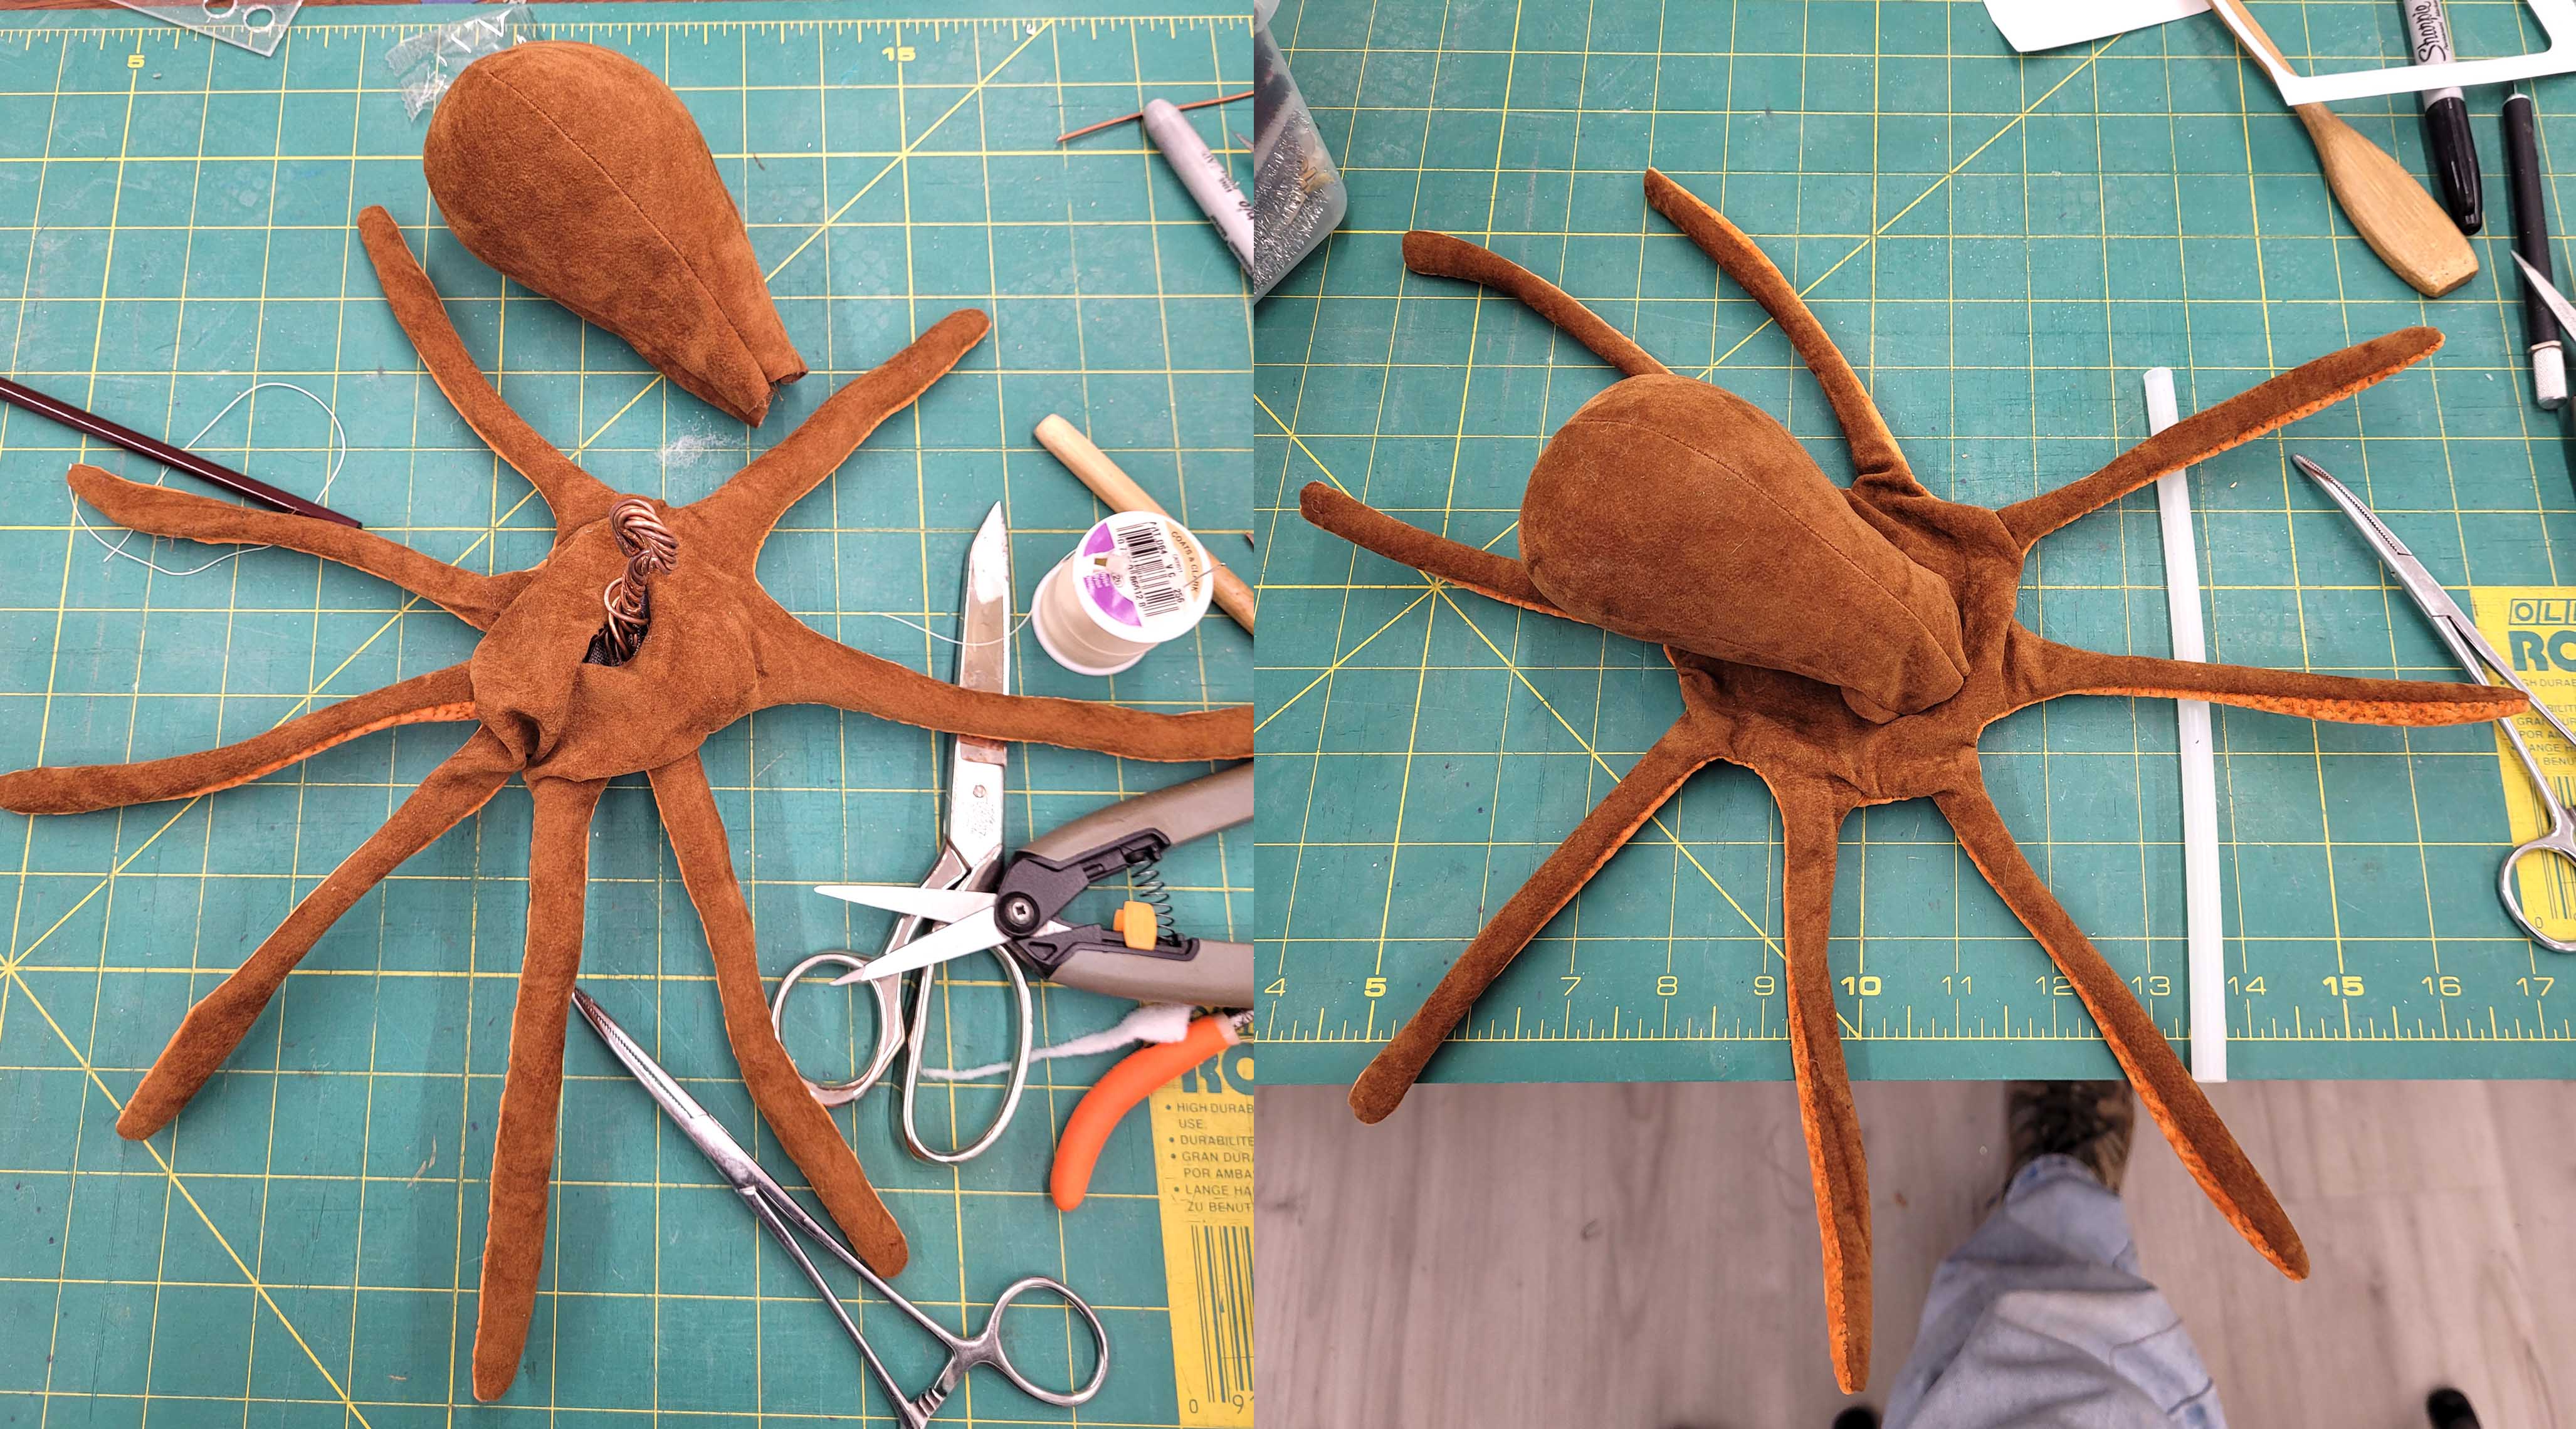
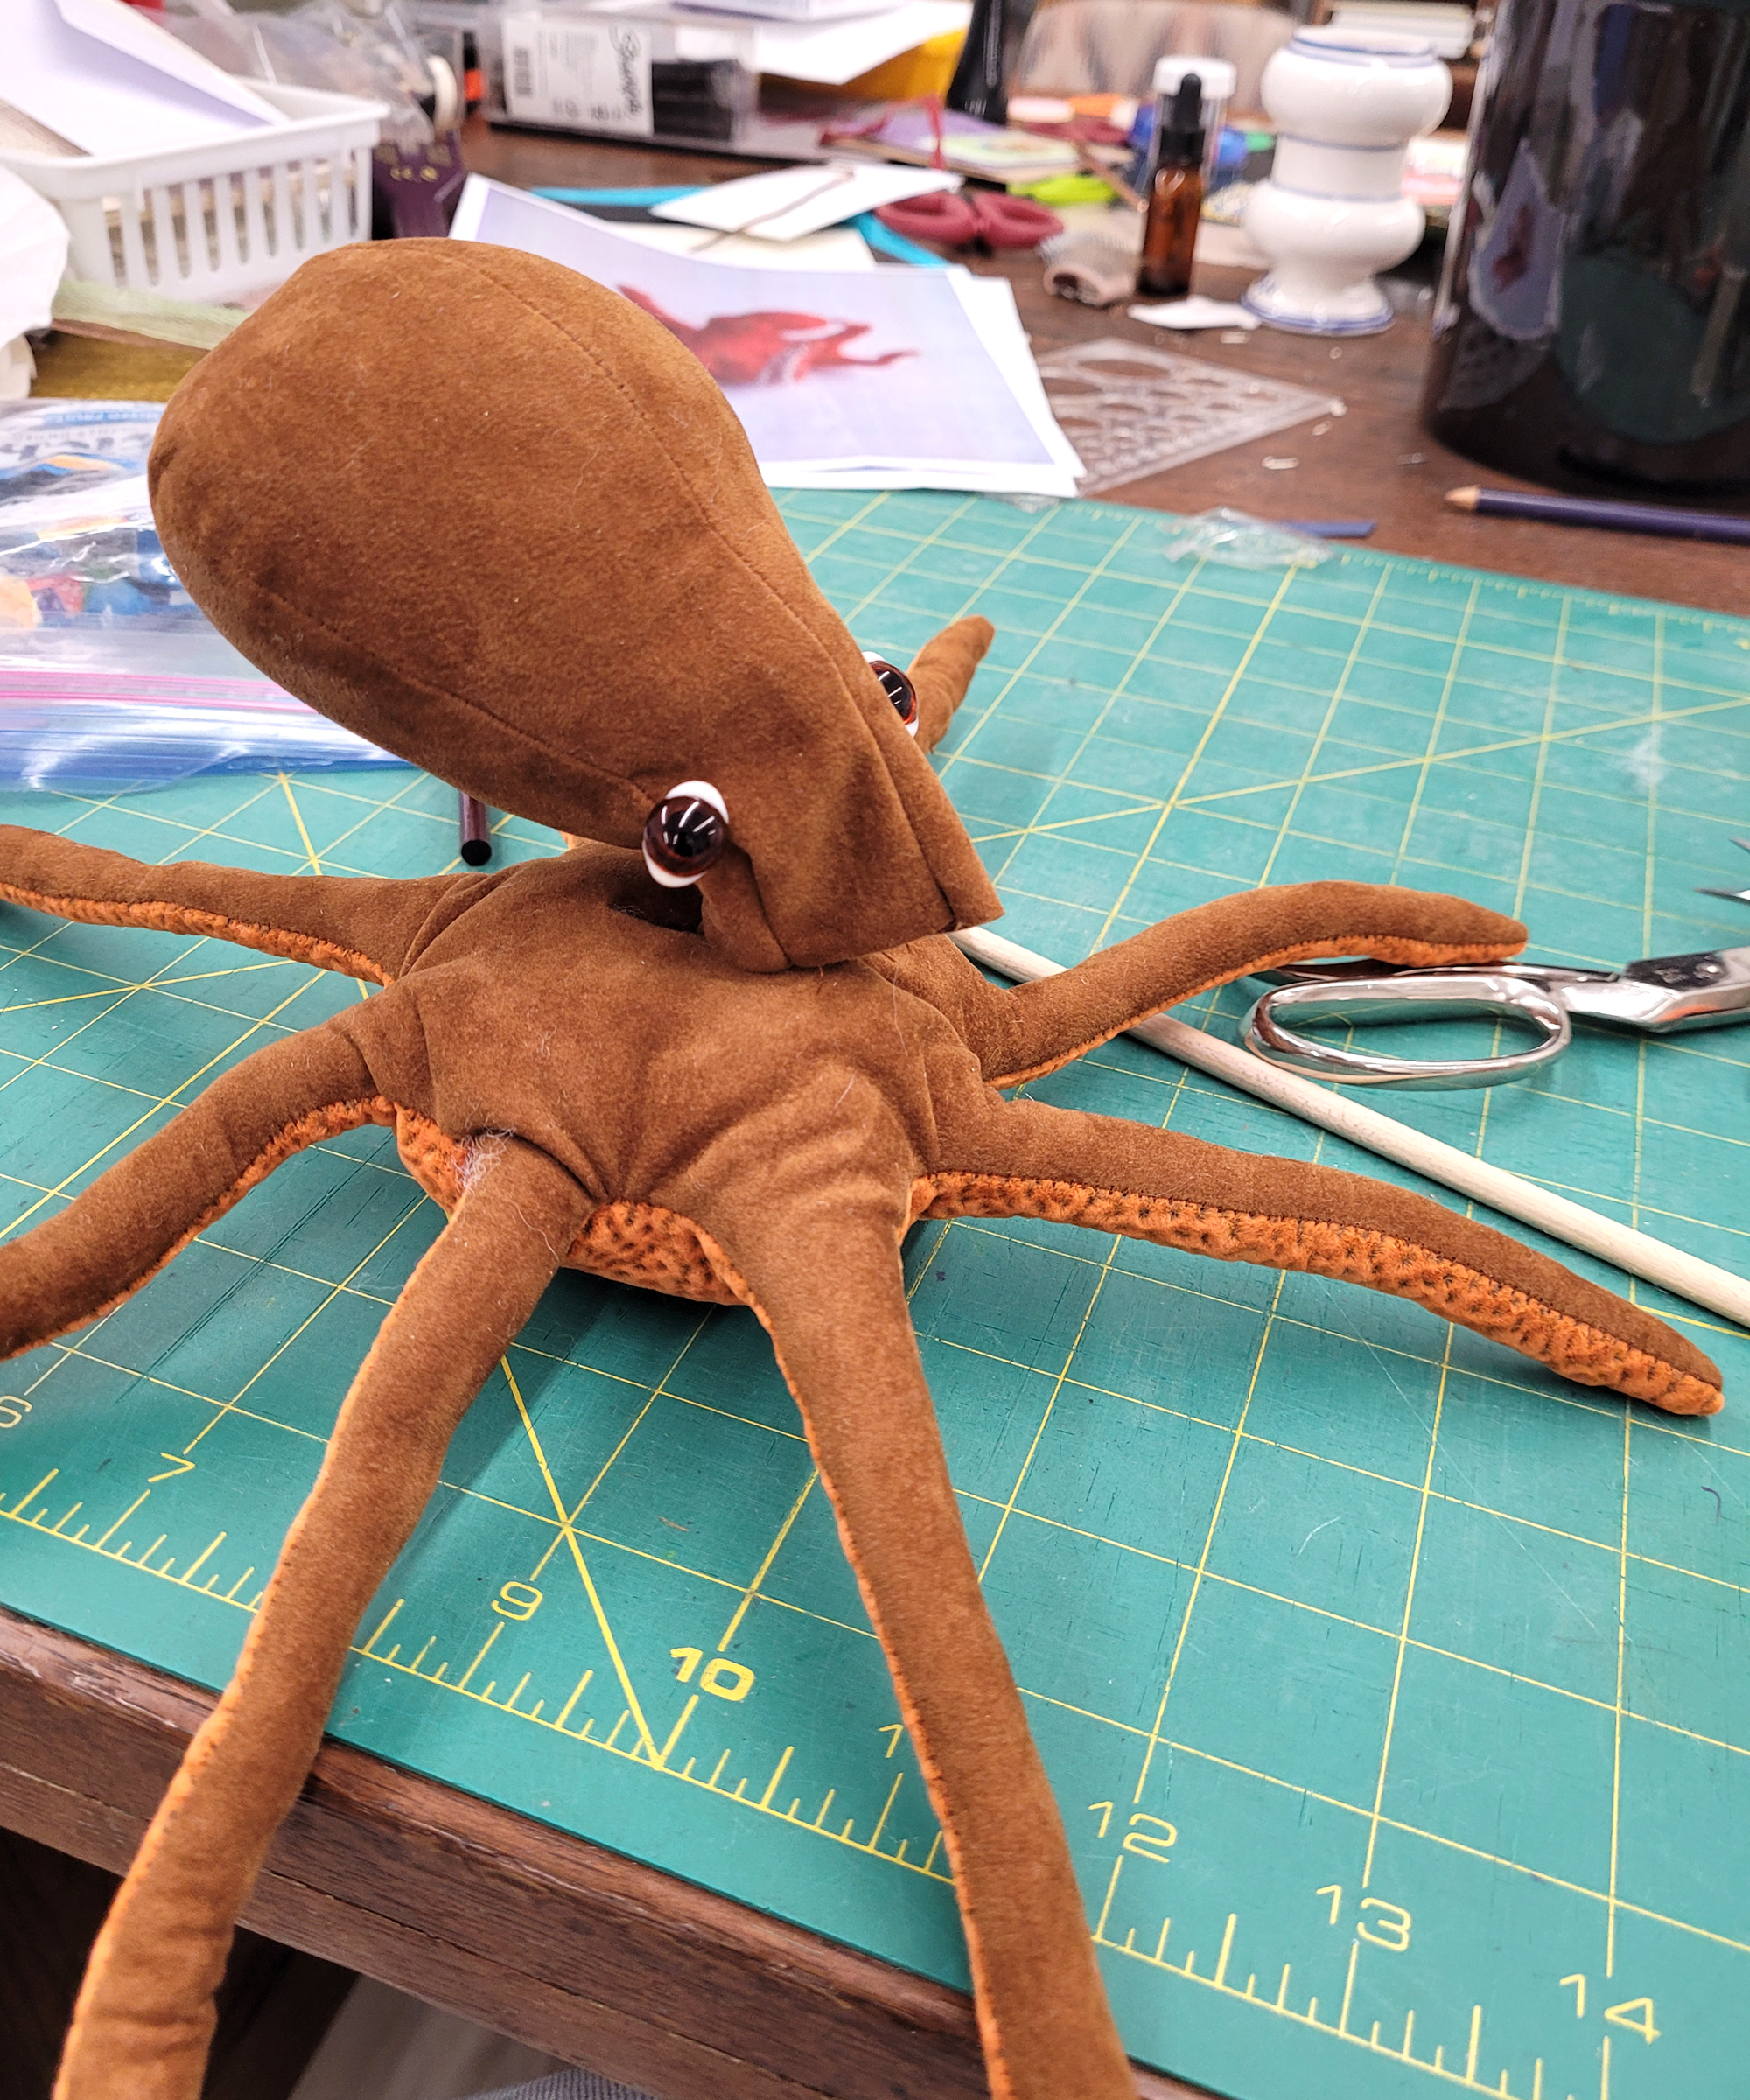
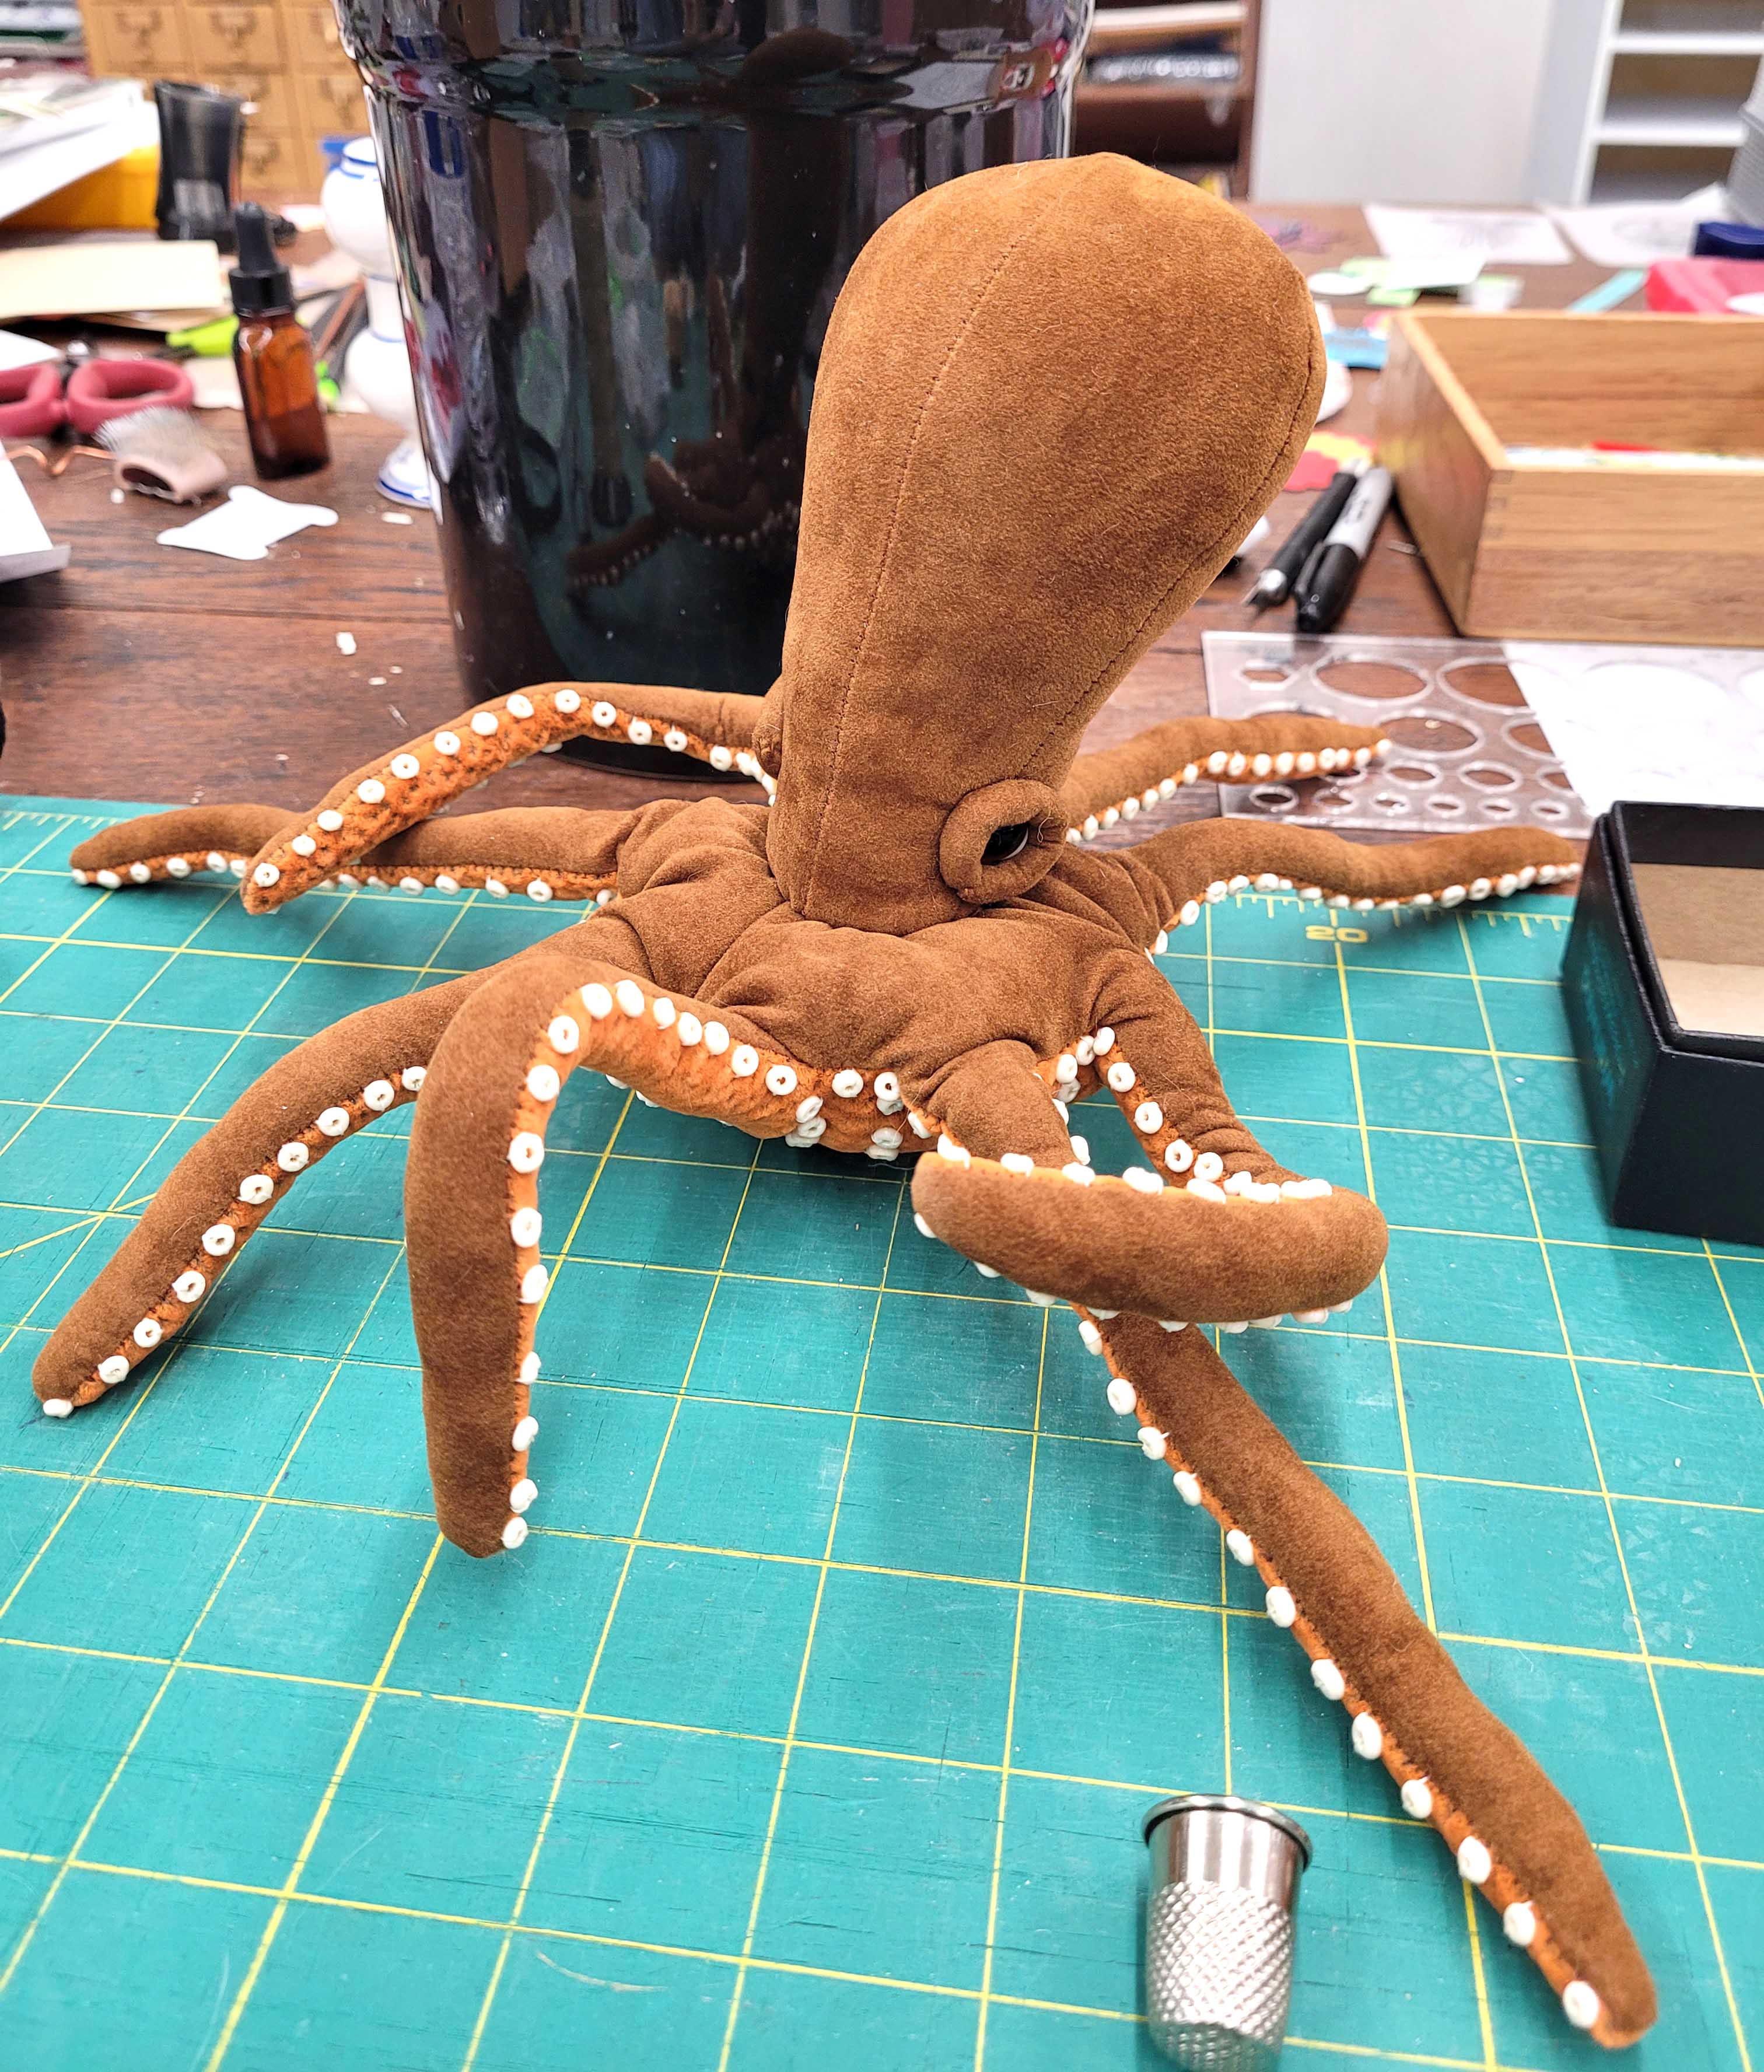
I did make a few new pieces for the 2020 online Philly show and the 2021 online Tampa show, but never got around to blogging. But while working on this year’s signature piece for the Philly show, I was taking pictures as I went – mainly so I could remember how I did it. I wanted to try creating an octopus. After several attempts in muslin, I finally got the head how I wanted it, and went looking for fabric. I found in my stash a brown skirt, bought at a thrift store for it’s velvet like fabric. Perfect. And for the underside I chose a nubby upholstery fabric in a burnt orange color.

I wanted to be able to pose the tentacles, so Bill twisted eight pieces of 14g copper electrical wire scrap together for me. Wish I could do that part myself, but I don’t have the hand strength for that gauge wire bundled together.

With the wires inside, it was time to place the head on and see how it would look.


Looks like a cephalopod (which an octopus is, also squid, cuttlefish and nautilus). But I digress. After a tedious stuffing of either thin tentacles, once again I try on the head and test fit a pair of eyes.

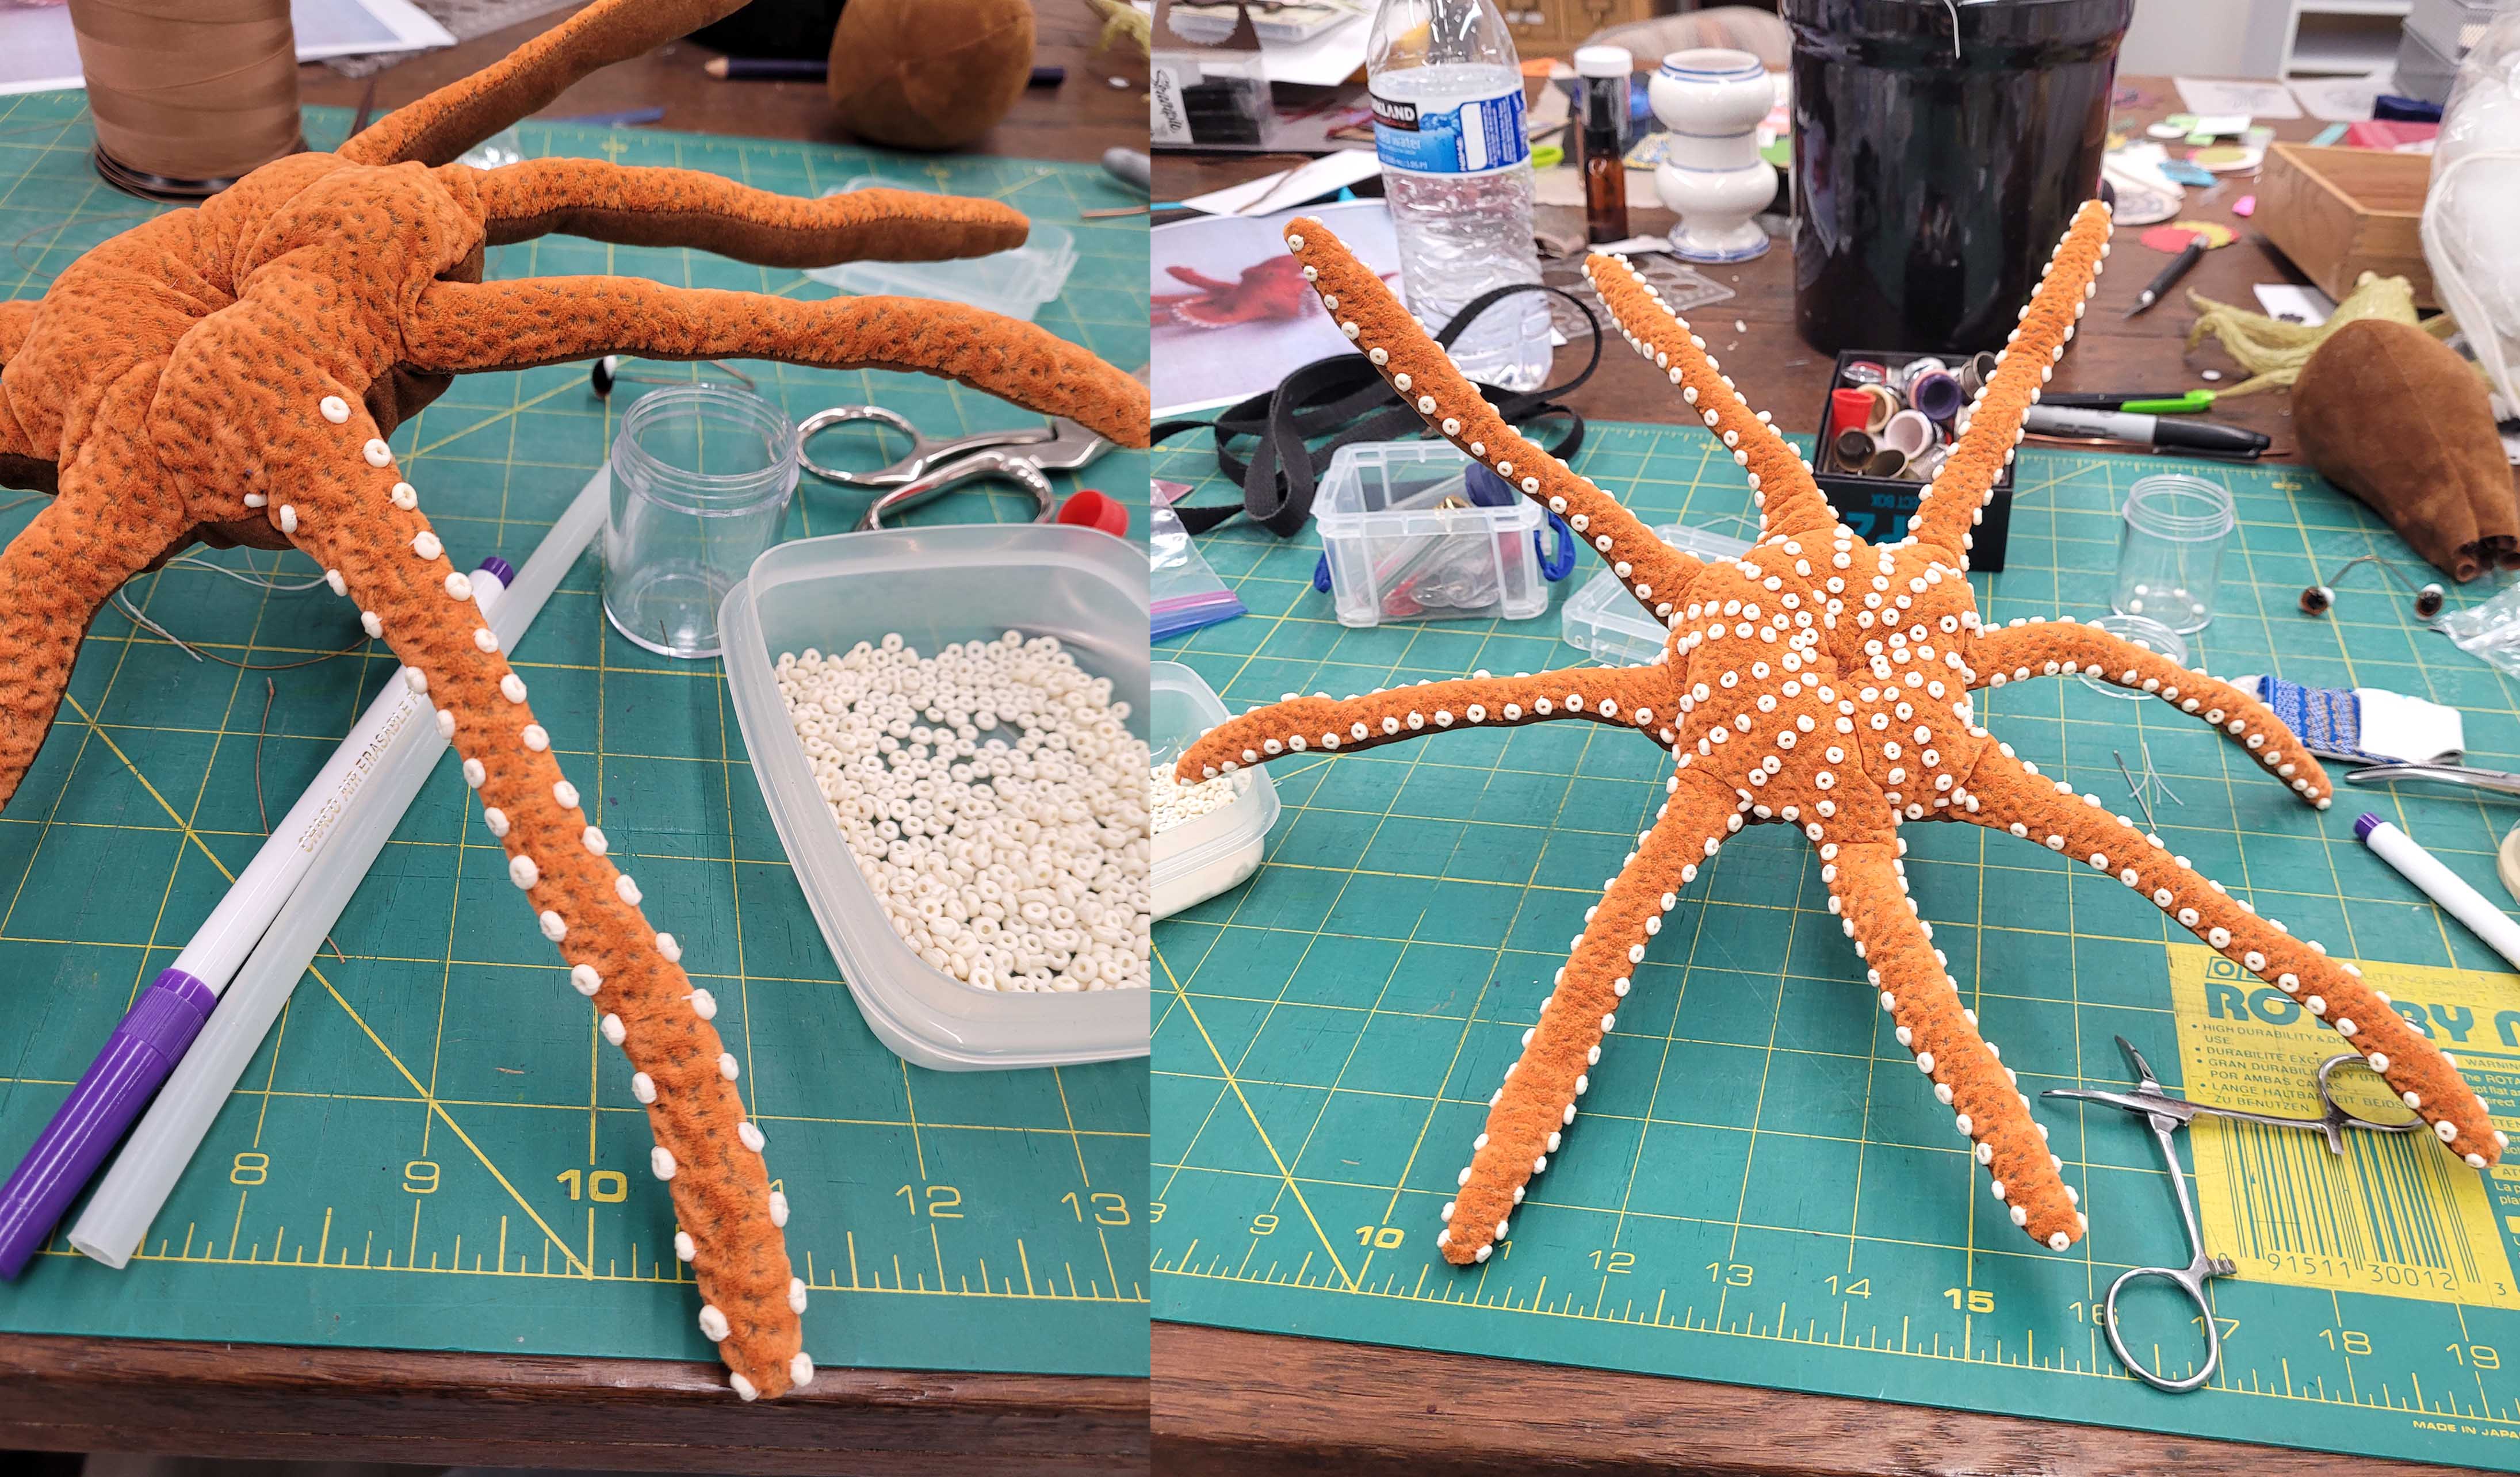
But before I can attach the head, I needed to add suckers to the tentacles and up into the mouth area.  Digging through my bead stash, I found some shell heishi beads that were the right style.  And though I would have preferred the suckers to be a bit larger, these would work. Each bead was sewn on using a matching off-white thread with two stitches each to anchor them well.  Another tedious step, so I took it an arm at a time, with breaks in between to let my eyes rest.

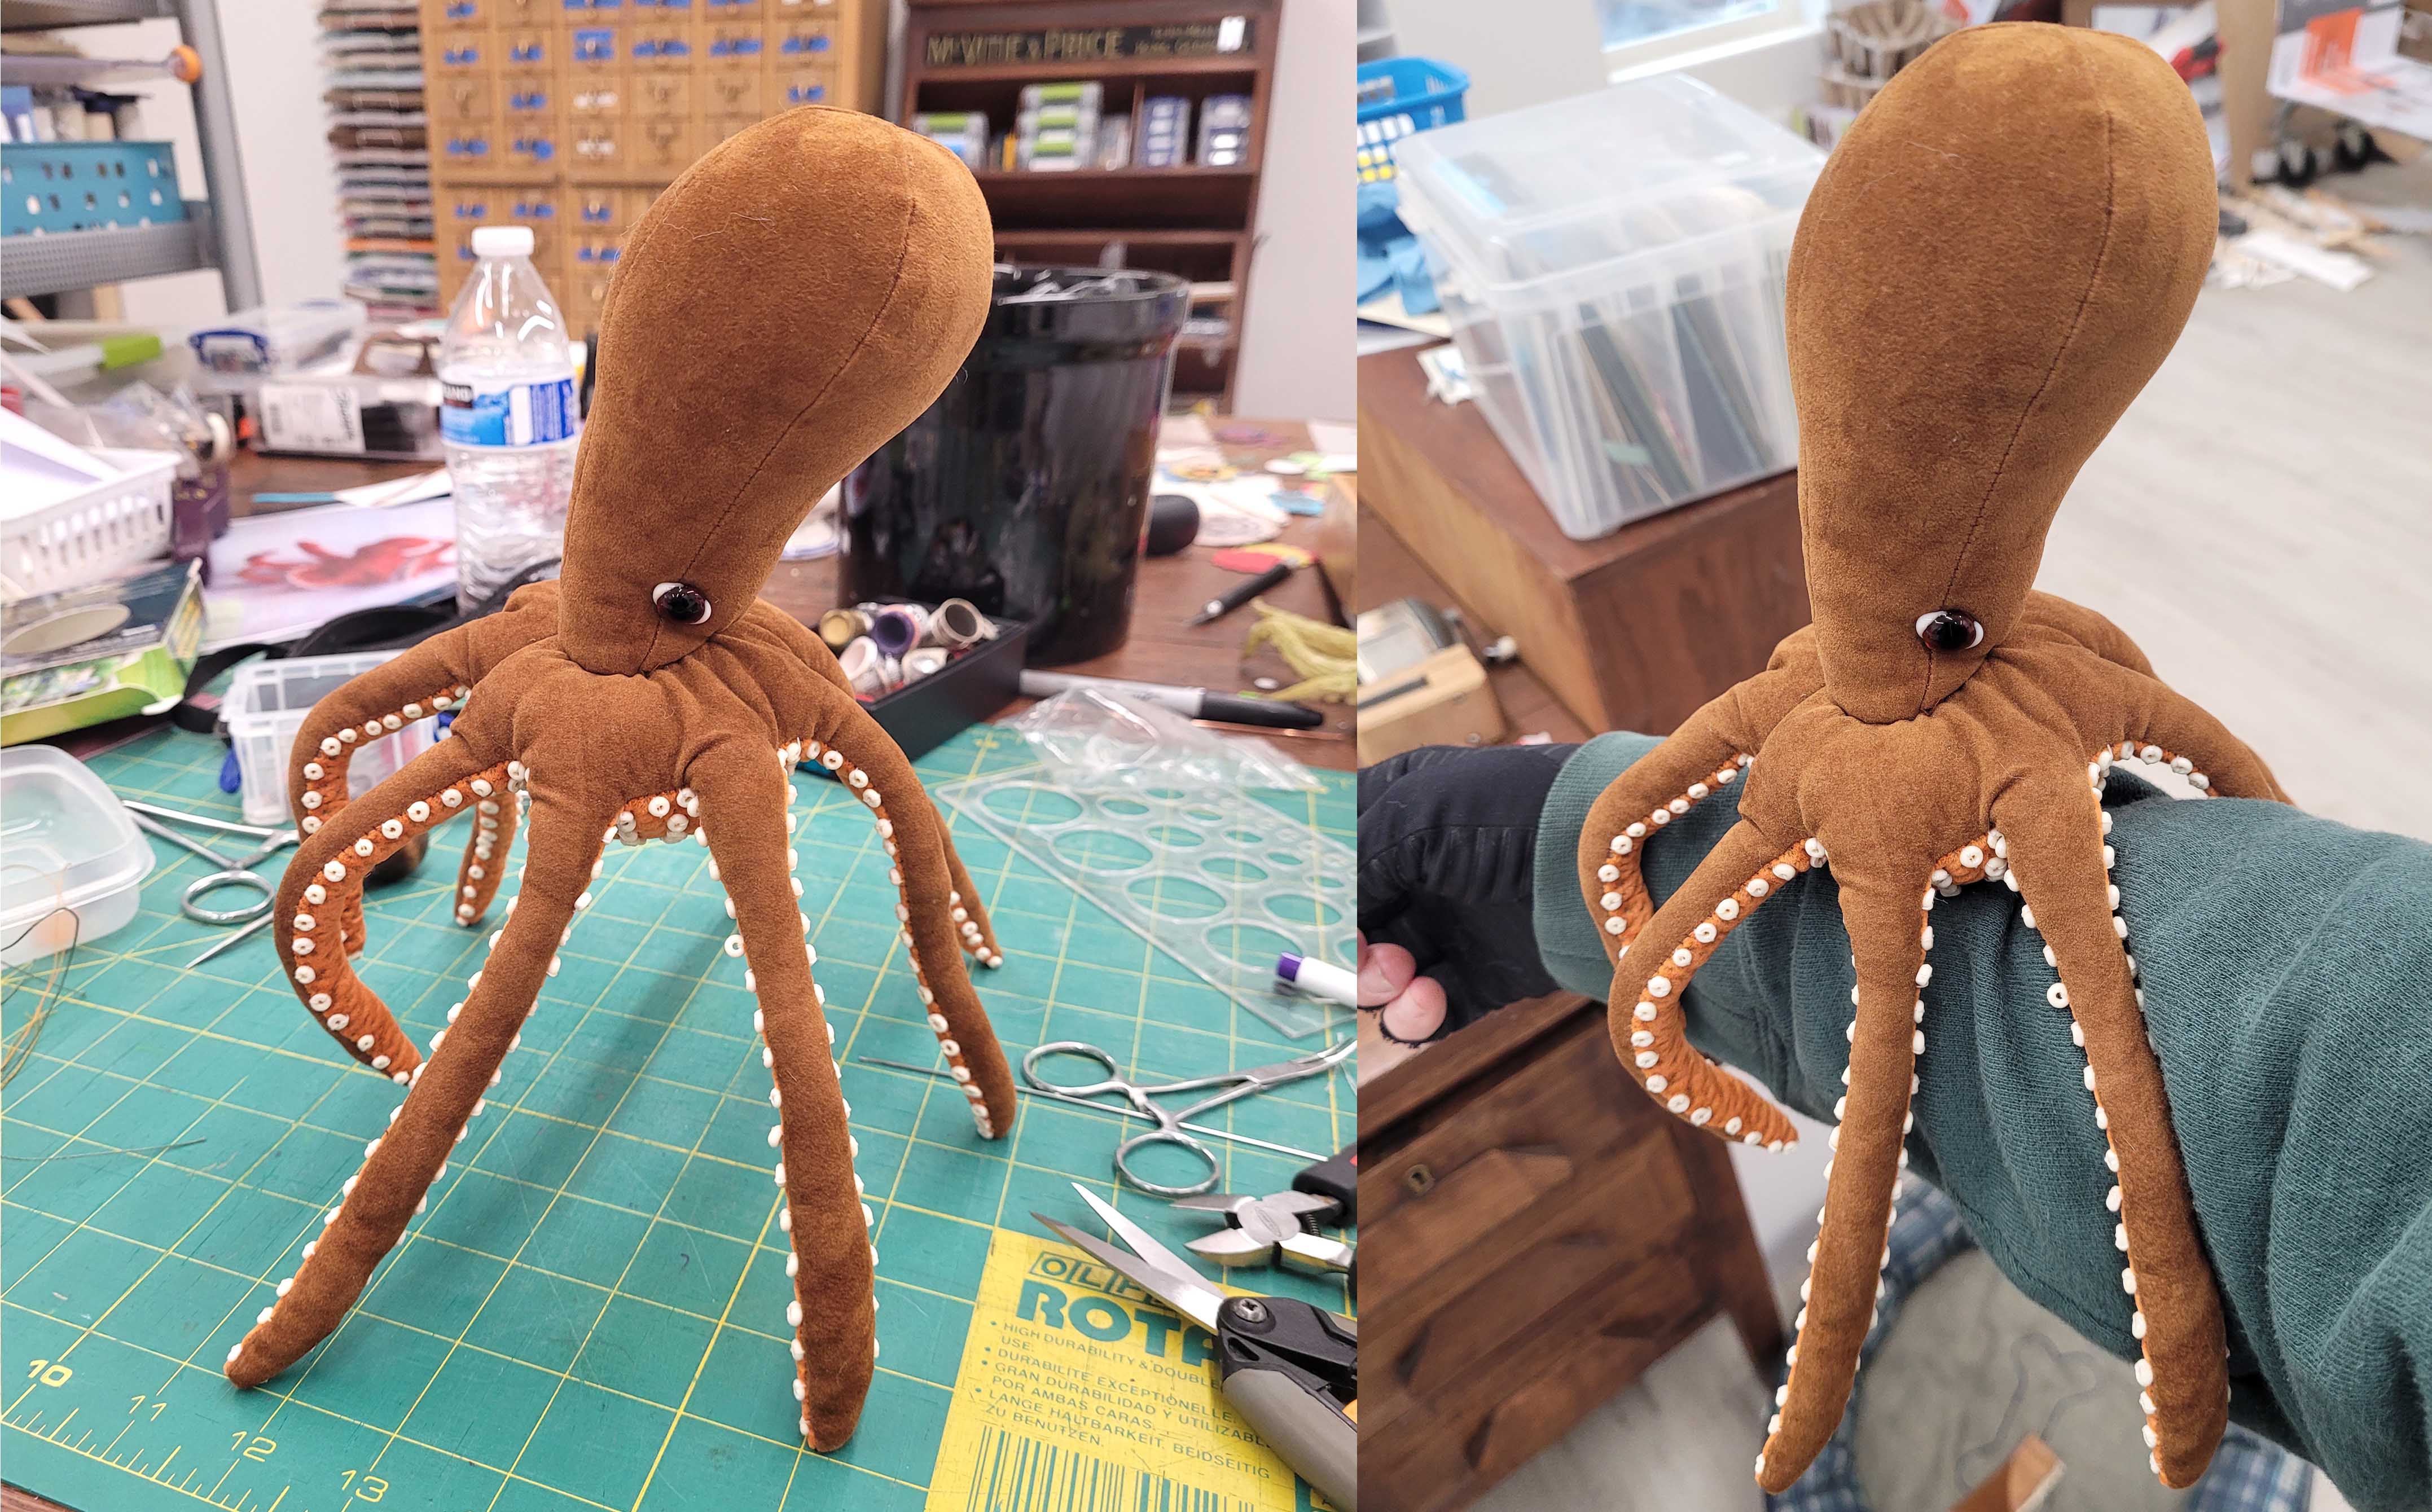
Once all the suckers were on, I attached the head to the body and inserted the glass eyes. I played around with positioning the tentacles and thought, hey, he can pose on my arm.

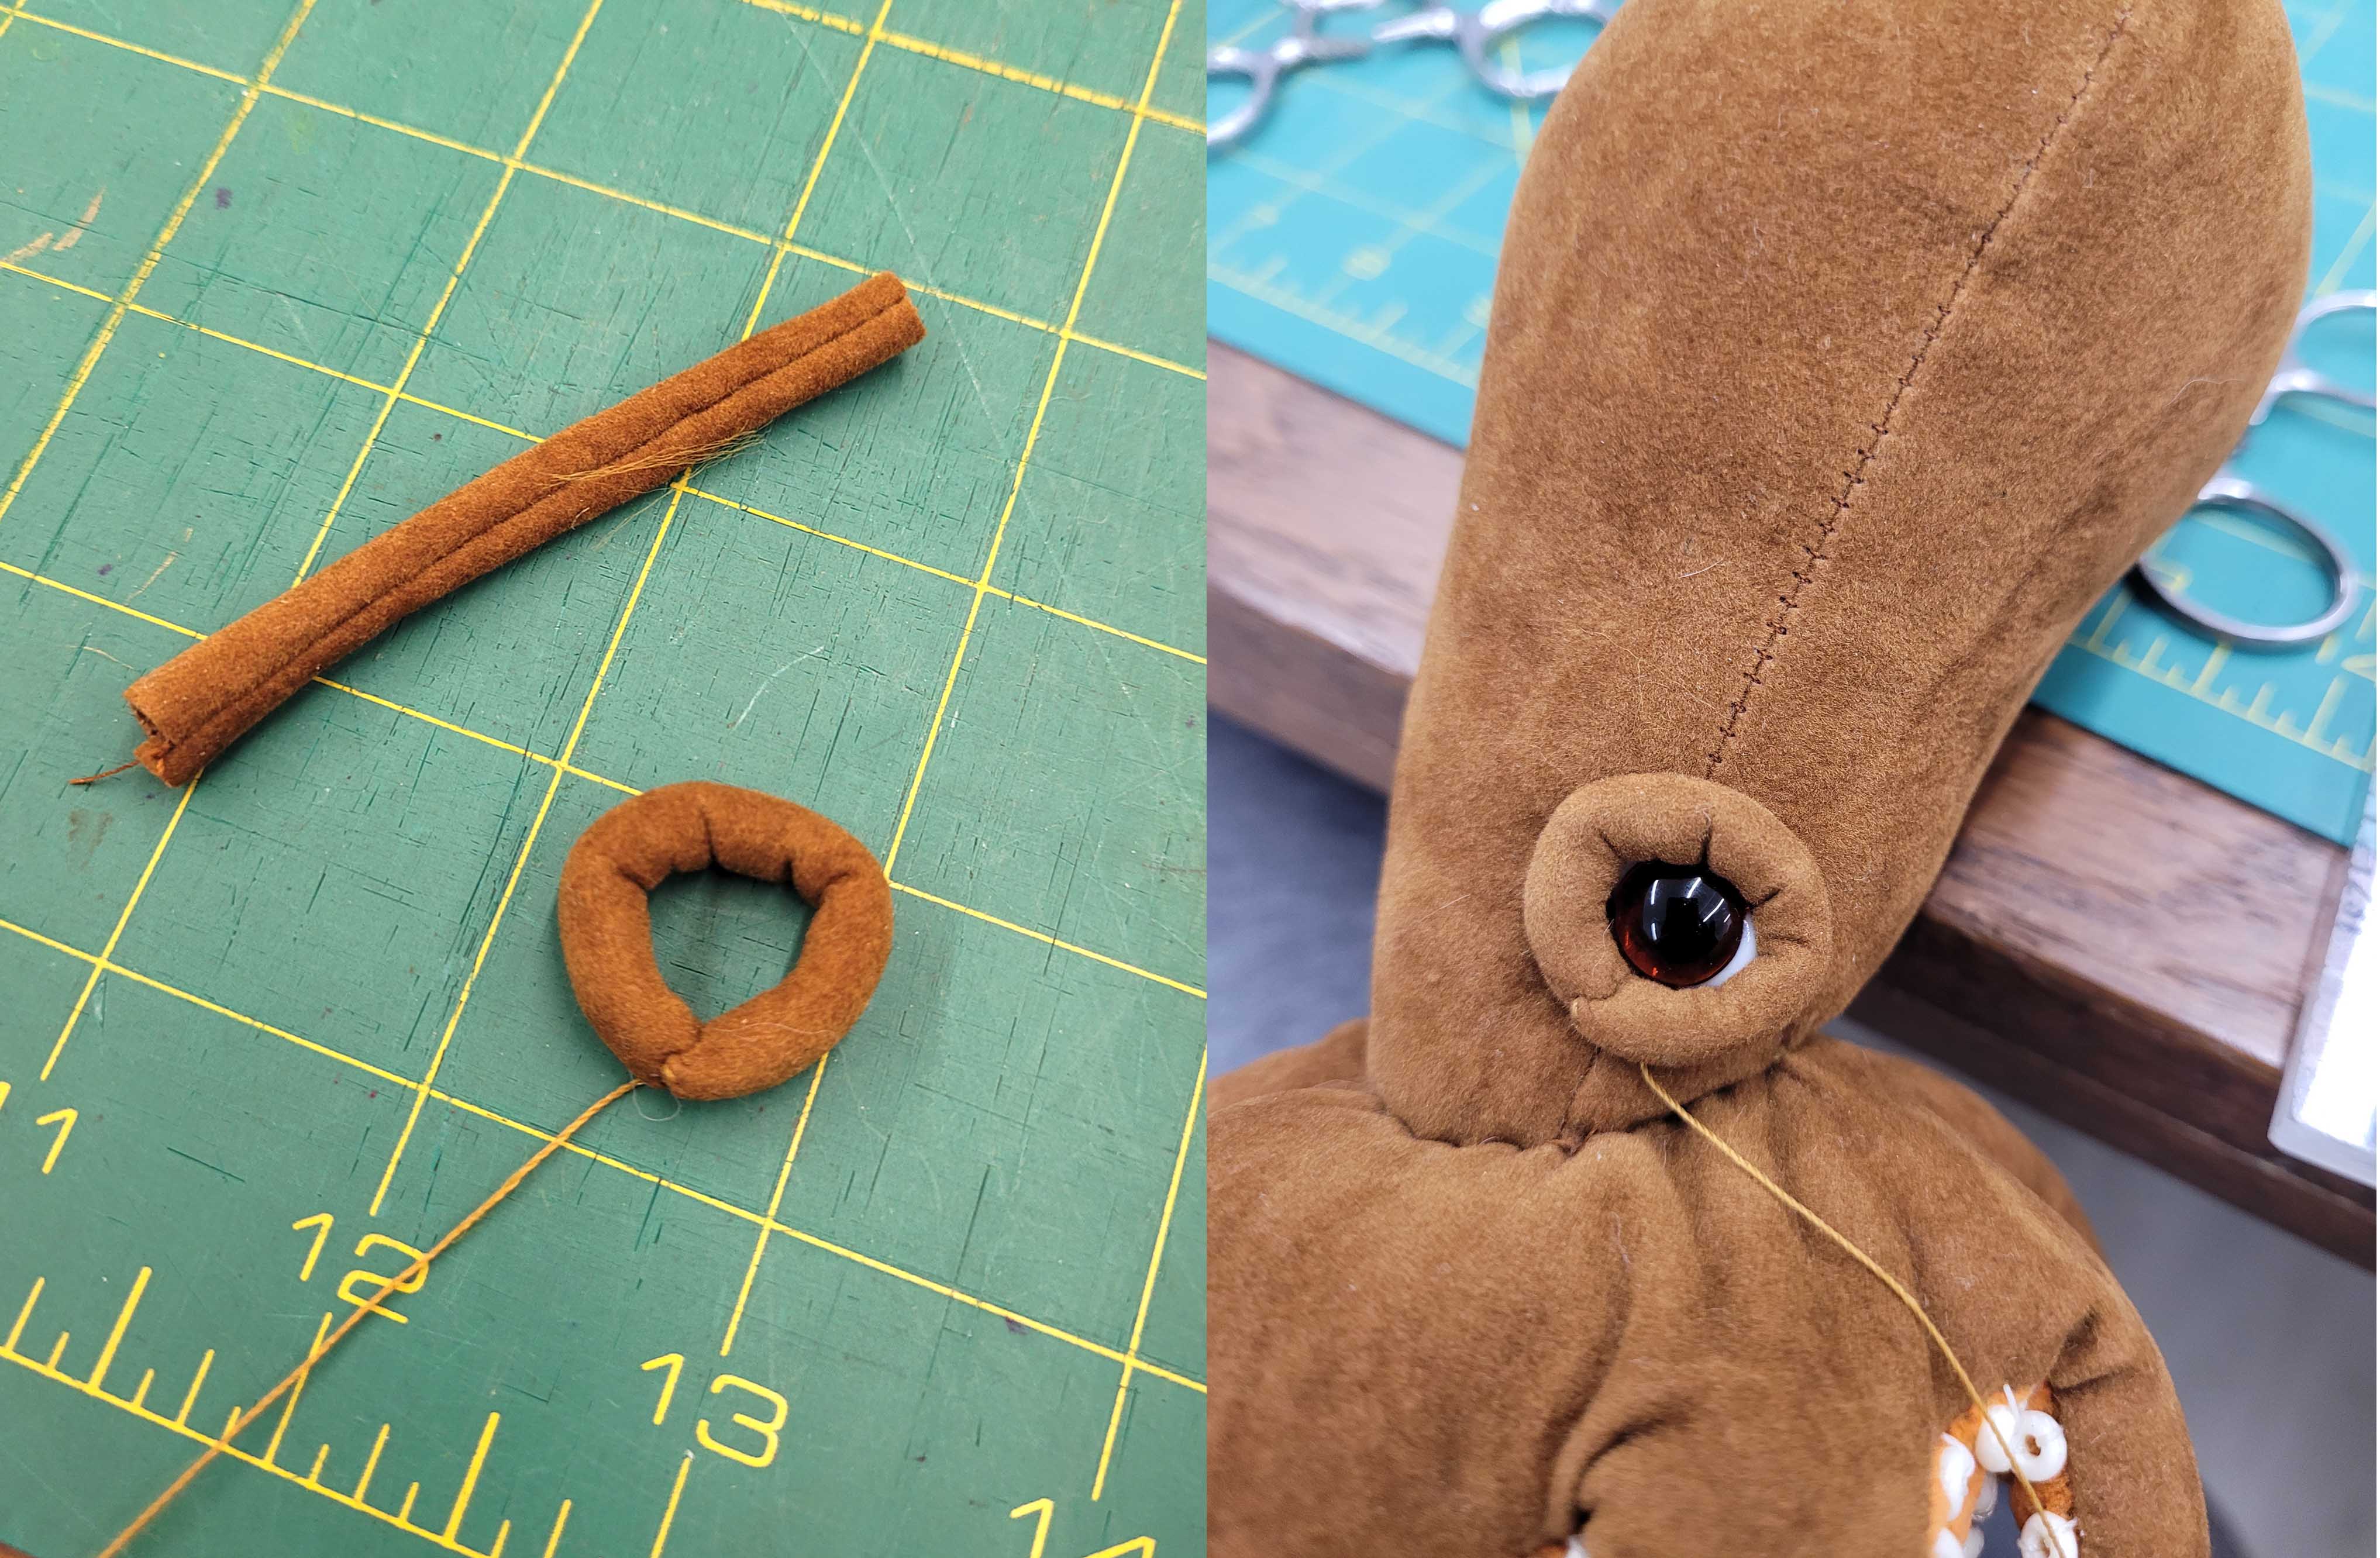
The eyes needed covering to look authentic and it took some thought to figure out how to get the look I wanted. I created a tube out of the body fabric, turned and lightly stuffed it, then sewed the ends together to make a doughnut shape. This was then carefully stitched onto the head around the eyes.

Now that looks like an octopus. I think I’ll call him Octavian. 

But this is a Doll & Teddy Bear show – and an octopus is not a bear. So, maybe he needs a companion? Check back for part 2.

Posted in teddy bears and such | Tagged , , , | 1 Comment

Steampunk Bear Hat

The Philly show has a few themed galleries in addition to the showcase gallery. The producers choose the themes – this year they brought back the Steampunk gallery – always a favorite with both the artists and the collectors. I was first thinking along the lines of a larger bear wearing a steampunk top hat, but since I’ve decided to try to focus mostly on the miniatures this year, I made the bear part of the hat.

The hat is made from a leather upholstery sample piece and the pattern pieces were cut using the Charity Wings top hat Sizzix die. Once the pieces were glued together, I added decorative stitching with waxed cord in several areas.

Another scrap of leather was added for a hat band and then I began to play with gears and parts scavenged from vintage alarm clocks. The old wind up Big Ben clocks have lots of nice brass gears in them and are not too difficult to take apart. The alarm clock faces would have all been too large, so I dug through my box of old watches until I found one with a nice large face.

The Sizzix die is designed so the hat can be worn using a headband. It fits into slots on the bottom of the hat, allowing it to be removed when desired. The bear, whose name is Barnaby, is made from a long pile miniature plush fabric. He is internally jointed, with glass eyes and thin ultrasuede pads.

Barnaby wears a vest made from vintage blue upholstery velvet with tiny brass bead buttons and his goggles are made from scrap leather, mica and a broken plastic straw. A bit of copper paint and some green alcohol ink were the final touches needed. Barnaby’s vest has a snap on the back which allows him to attach securely to the hat’s band.

I hope you enjoyed meeting Barnaby as much as I enjoyed making him and the hat.

Posted in teddy bears and such | Tagged , , | 2 Comments

Summer Joyride

I’m getting ready to do the show in Philadelphia sponsored by the Susan Quinlan Doll & Teddy Bear Museum. The show always features a special gallery of one of a kind pieces done by the attending artists. For this year’s gallery I had an idea of a bear riding a dragonfly. I started with a basic sketch, just to remember the idea. This is obviously not to scale, but it helps me to get started. The bear sketch is typical of my work – I create a pattern based on this side view sketch.

I began by making the wings of the dragonfly using copper electrical wire scrap in 12 and 14 gauge and 22 gauge jeweler’s copper wire for the wrapping, adding faceted crystal beads in two shades of blue. 

Once four wings were done, I needed to figure out an armature for the body and then begin creating patterns for the body pieces. I knew I wanted to do beadwork on the thorax, so that was done before the pieces were sewn to the armature. After stuffing and closing more beads were added. Same for the upper thorax with sequins and beads. The tail was sewn then stuffed and drawn over the end of the wire armature.  The body and tail pieces were made using upholstery fabric samples.

The head was made with a velvet like fabric and the eyes from some shimmery fabric from a thrift store blouse. I did some embroidery on the front of the head and added more sequins and beads to the back, then attached the head to the body. 

The fairy bear was made from specialized miniature plush fabric in a tie-dye yellow and green palette. He is jointed at the head, arms and legs with internal disc joints. He has glass eyes and a nose stitched from metallic embroidery floss. His wing were from a salvaged butterfly brooch and his necklace is of tiny seed beads with a floral pendant drop.

The fairy bear is 3″ tall. The dragonfly is 16″ long with a 16″ wingspan. I’ve displayed it on a piece of driftwood. The piece is called “Summer Joyride” and will be at the show in Philadelphia on May 2, 2019.

Posted in beading, recycled creations, teddy bears and such | Tagged , , , , , | Leave a comment

Old Coat to New Treasures

At a recent show in Tampa FL, the promoter had asked the artists to participate in challenge called “Old Coat to New Treasure”. We were asked to create a piece using an old coat. I found this one at a thrift store – it was heavy brown fabric with an acrylic plush lining.

The plush was a mixed grey color, with a very dense pile and thick knit backing. Using the lining from the hood, I created a 7″ jointed bear.

Due to the thickness of the pile and backing, I stitched the entire bear by hand, using some black faux suede fabric for the paw and foot pads, as well as the inner ears. The bear was given black glass eyes and a purple perle cotton nose and finished with a sheer purple ribbon bow.

The bear was finished, but I still had all the lining from the rest of the coat and I had been mulling an idea for quite a while. My next creation using this plush included not only the fabric from this coat, but a variety of other recycled materials – upholstery fabric samples, three different types of wire, and of all things, a black plastic garden flowerpot.

Marty the moth’s body is made from the coat lining. His wings are made from two upholstery fabric samples, the upper ones accented with beading and the lower ones quilted. Welding rod wire was used for the wing armature.
The proboscis (mouth) is a scrap of electric wire fencing and the legs are made from wire coat hanger covered in fibers and faux suede. And the plastic flowerpot – that made the feathery antennae.

Marty’s body is quite plump, the result of stuffing and item made from a knit backed plush – it tends to stretch quite a bit.  I have just received some new fabric from another bear maker with a woven backing. I am looking forward to trying a new moth with that. 

Posted in recycled creations, teddy bears and such | Leave a comment

Philly Doll & Teddy Bear Show 2018

The Quinlan Artist Doll & Teddy Bear show was held in April this year and I created a new 5 1/2″ bear design for my show pieces. All of the bears were hand-sewn, instead of using a machine. Each bear was made from a different material – I chose mohair, alpaca, and synthetic plush fabrics.

Each year the show has a signature gallery which allows each artist to create a one of a kind piece to highlight. This year I made my first steampunk bear, who is named Murdoch. He is mohair and wears a leather flying helmet and leather goggles. His flying machine was made from bits of this and that, including a vintage electric bicycle bell, faucet handle, scraps of metal, wood, and velvet. The wings were made of stitched rusty fabric. They have wire ribs and are attached to the sides of the machine in a way that allows them to fold.

The show also has another gallery of themed pieces and one theme for 2018 was famous American men and women. A pink mohair bear was given a mohair swan hat and tutu of vintage linens and lace with hand-beaded bodice. While searching for American ballerinas, I learned about Agnes de Mille, who was a ballerina and choreographer. This bear now had a name and a place in the gallery.

The rest of the bears were created and then given names based on small towns here in Alabama.  Wilmer is a alpaca plush bear who wears a knitted carrot hat and hangs out in a galvanized watering can with a fresh picked radish. Elmore likes to show off the trout he caught in the river. His vest and hat are hand-stitched of leather and he has tiny fishing “lures” attached to his hat.

Leighton is a green mohair bear with metal dragonfly wings. His wings are accented with Swarovski crystals and he has a golden crown sitting slightly off-kilter on his head. Sousa is a red mohair bear with a vintage ribbon ruff and a blue leather top hat. His brass trumpet is just right for playing marches in a parade.

I had made two bears in very pastel colors. Shelby is of light pink mohair and Tibbie of a soft green synthetic plush. Since they reminded me of Easter colors, I paired each with a vintage tin egg, some paper “grass’, faux bird eggs and each has a little resin chick friend.

The last three bears created for this show were Hazel Green in a tipped brown mohair, Margaret in blue mohair, and Shiloh, in tipped beige mohair. Each has a nose of colored perle cotton and a ribbon with charm.

I enjoyed creating these bears and showing them to collectors at the Philly show. Murdoch and Agnes have been adopted, but the rest are still available and can be found in my Etsy shop. If you’d like to add one to your collection, click on over for adoption information.

Posted in Uncategorized | Leave a comment

Recreating a Sea Urchin in Resin

I love all things ocean and beachy and that includes sea urchins. I love to incorporate those images in my designs, but natural items like sea urchins, sea shells, and starfish are fragile and do not often hold up well in jewelry designs. Having been introduced to Ice Resin and molding putty by Jen Cushman and Susan Lenart Kazmer, I found an ideal way to bring my favorite beachy things into my designs, while making them durable.
I began with a nice sea urchin found in a bag of shells at a local thrift store. Using the putty, I formed it around the shell and let it set up. Removing the urchin from the molding putty is tricky, and I did have to put a few slits along the top. After the mold cured completely, I cast an urchin using Ice Resin tinted with some off-white acrylic paint.
The resin urchin was then colored with paints and gilders paste. I added a Swarovski crystal in the center and mounted the urchin in a bronze colored bezel. 
I’ve taken several metal working classes at the Bead & Button Show from SLK and last year was one on making components with texture and patina. I combined these components with my sea urchin bezel, crystal beads, wire work, chain, and silk ribbon. The result was a striking yet fun necklace that I love to wear.

We used a special tool to corrugate the metal and metal alphabet stamps  – “SUN” is on this second component.

More corrugated metal (layered) and “SEA”. The eyelets were another technique she taught.

The pieces that hang from the bezel have my birthdate on them. I’m a July baby. Maybe that’s why I love beachy things.  I’m excited to be going back to Milwaukee to take another class with Susan in a few weeks.

Posted in Uncategorized | Leave a comment

Deconstructed Reconstructed Retreat – Sunday Assemblage

Our last day of retreat was Sunday and we focused on assemblage pieces. Jen had brought a huge tub full of wooden boards, canvases, and picture frame samples. I picked out a board with a large knot hole in it and a frame sample that looked like a woodpecker had spent some time with it. After trimming off the end of the board with a chop saw, I nailed the frame sample to the board. Now I have a house – what to do with it?

Among the items I had brought with me were a silverplate ladle which I always wanted to use as a platform for a bird’s nest. I drilled a hole in the handle and attached it to the house.

Into the ladle, I placed some raffia and a resin bird ornament that I had redone with paint and gilder’s paste.

In the knot hole I tucked a tiny frozen Charlotte doll I purchased from Anne Beach during the retreat. Anne sells her wonderful things on Etsy – BeachFleaMarket.

To finish I added the words from Neil Diamond’s “Be” from Jonathan Livingston Seagull. I printed the words then tore them apart and added some distress ink before attaching them to the roof.
It was a wonderful weekend. I learned so many new techniques, but more important, I learned so much about myself and my artistic voice. Thanks Jen and all the women who attended. We really must do it again sometime.

Posted in Uncategorized | Leave a comment